
What does slicer software do in FDM printing?
Let’s imagine that you have your 3D modeling software open and have just finalized your design. Great! You might think you’re ready to send your file straight to your 3D printer.
Not so fast. You need to prepare your file using slicer software, first.
A slicer program is a critical piece of software that you need for 3D printing. Here’s what a slicer does:+
Slices your model into layers
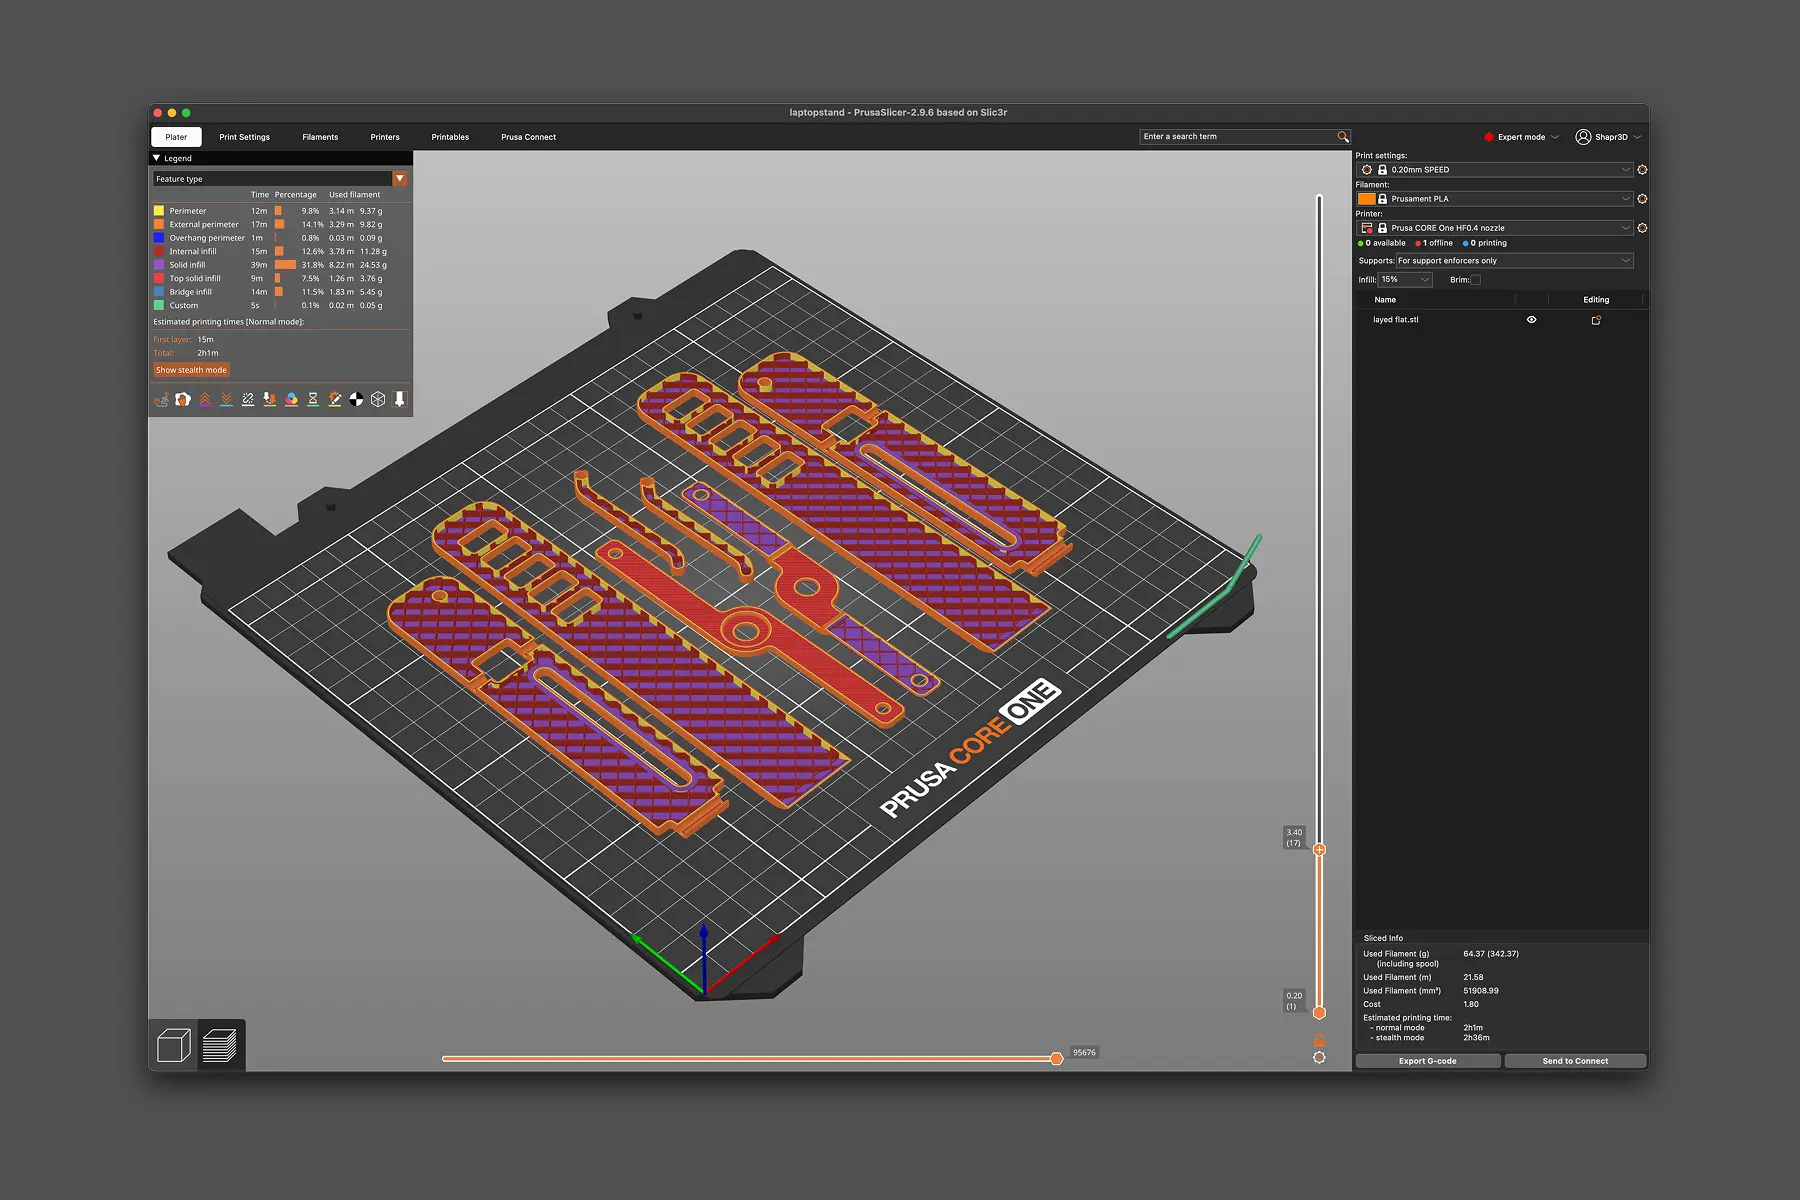
Slicer software “slices” your 3D model into dozens, or even hundreds of thin, horizontal layers. For FDM printing, this process translates the 3D geometry of your model into a toolpath that your printer can read and follow. The 3D printer directs the nozzle along the path, extruding filament along the way, to build your object layer by layer.
Controls printer settings
You can set your slicer settings to make the layers of your model thicker or thinner. Your slicer settings also control the printer’s temperature, speed, colors, and other details, like adding infill and supports to your model. We’ll go into more detail on how these settings affect your print later on.
Generates G-code instructions for your printer
All the information above is translated and exported as a G-code file (.gcode). G-code is machine-readable code that your 3D printer is designed to follow. The G-code instructs your printer to move to exact coordinates, heating and extruding filament at certain speeds, all of which are part of the process of building your model.
Compare this process to a regular printer. When you set up an inkjet printer to print PDFs and documents on pieces of paper, you usually need to install software called a printer driver on your device. The printer driver translates the data in your print file – the shapes and colors that make up your text or images – into a series of commands that the printer can “read.”
In a similar way, slicer software acts as a go-between, translating the data from your 3D model into instructions that your 3D printer can read.
But while your printer driver works in the background to automatically translate the file (meaning you don’t have to do much for it to work), slicer software is a full program that allows you to customize many aspects of your print. We’ll break down how to use it, but first, you’ll need to decide which slicer software is right for you.
Slicer software for 3D printing: A comparison
Here’s a general breakdown of the slicer software we’ll be comparing below for FDM (fused deposition modeling) printing.
Best slicers that are compatible with most 3D printers
The following slicers have the broadest compatibility with a wide range of FDM 3D printers.
PrusaSlicer
Pricing: Free
Supported platforms: Windows, Mac, Linux
Where to download: Prusa website
Key features: Wide range of tested printer profiles, beginner-to-expert modes, auto-updates, multi-material prints, established community, iPad slicer capabilities on Prusa Easy Print app
PrusaSlicer is a free, open-source slicer software developed by the makers of Prusa printers, but it’s well-known for being compatible with a wide range of third-party printer brands. You can use preset printer profiles if you’re just starting out, or use expert mode to tweak every setting. PrusaSlicer integrates with the company’s cloud solution, Prusa Connect, allowing you to store G-code print files, send files to the printer, and remotely monitor your prints.
Prusa has tons of resources available, including a Prusa Slicer community, tutorials and guides, and an ecosystem of ready-made 3D models on its Printables site. It also has a cloud-based app, Prusa Easy Print, which gives you some slicing capabilities on your iPad tablet or mobile phone.
OrcaSlicer
Pricing: Free
Supported platforms: Windows, Mac, Linux
Where to download: OrcaSlicer website
Key features: Advanced tuning, broad compatibility, fast slicing
OrcaSlicer is a free slicer that is a fork of Bambu Studio, meaning its creators used some of the original project’s source code to create a new project. It’s proudly open-source, inviting users to build and contribute. It has profiles for hundreds of printers, maintained by a community of users. It’s a great program for those who have more advanced knowledge of 3D printing and want to tinker and tweak different settings.
Ultimaker Cura
Pricing: Free
Supported platforms: Windows, Mac, Linux
Where to download: Ultimaker website
Key features: Simple, basic slicing for beginners, preset printer profiles, established community
Cura is a true beginner-friendly slicer, with an approachable interface, tons of presets, and broad printer compatibility. While you can expose up to 400 settings with a custom mode, the beauty of Cura is that you don’t have to fiddle with them. It’s best for those who want to use its extensive presets, while makers who like to fine-tune their prints might prefer OrcaSlicer or PrusaSlicer. Because Cura has been around for a long time, it has a large community for new users looking for support.
Best slicer software for particular printer brands
Many 3D printer manufacturers release their own slicer software (which is often a fork of an existing program) optimized specifically for their printer lines. These slicers shine when used with their printer ecosystem. If your printer isn’t from these manufacturers, we’d recommend using one of the general-purpose slicers above, or your manufacturer’s recommended software.
Bambu Studio
Pricing: Free
Supported platforms: Windows, Mac, Linux
Where to download: Bambu Lab website
Key features: Tight Bambu Lab integration, user-friendly interface, multi-color and multi-material support
Bambu Studio is Bambu Lab’s slicer software. It’s a fork of PrusaSlicer, but designed to work best with Bambu Lab printers. If you have a Bambu printer, you can’t go wrong — the slicer is made for a Bambu ecosystem workflow with tried-and-true printer profiles and colorizing tools for multicolor, multimaterial prints with Bambu’s automatic material system (AMS).
Creality Print
Pricing: Free
Supported platforms: Windows, Mac, Linux
Where to download: Creality website
Key features: Integration with Creality printers, multi-material support
Creality Print is Creality’s own slicer software optimized for its printers. Its newer versions are a fork of OrcaSlicer, giving it an advanced feature set for calibrating settings like temperature, flow, and retraction. It also has remote printer management, allowing you to print straight to your Creality printer without using an SD card or USB. It doesn’t have broad support for printers outside the Creality ecosystem, so if you’re looking for the same level of calibration, check out OrcaSlicer.
ElegooSlicer
Pricing: Free
Supported platforms: Windows, Mac
Where to download: ELEGOO website
Key features: Integration with ELEGOO printers, strong calibration tools, multi-material support
ElegooSlicer is ELEGOO’s slicer software for its own line of printers. Similar to Creality, ElegooSlicer is based on OrcaSlicer, meaning it has those advanced calibration settings and other features you may see in OrcaSlicer, just optimized for the ELEGOO ecosystem. On the ELEGOO website, you’ll see that the company offers downloads for Cura software, too, because it was their legacy slicer program. Older ELEGOO printer models may recommend the Cura software, while ElegooSlicer is the newest recommended program.
Anycubic Slicer Next
Pricing: Free
Supported platforms: Windows, Mac, Linux
Where to download: Anycubic website
Key features: Integration with Anycubic printers, strong calibration tools, multi-material support
Anycubic Slicer Next is based on OrcaSlicer, just like Creality Print and ElegooSlicer. It supports Anycubic printers with optimized presets that have been tested for reliability, and has strong multi-color capabilities when paired with Anycubic’s multicolor printers. Anycubic Slicer Next also allows you to send your files to the printer remotely and monitor aspects of your print like temperature, filament, and status, as long as your printer supports it.
Online slicers
Online slicers are a convenient option for those who use communal computers and 3D printers at libraries, makerspaces, and schools. You don’t need slicer software downloaded on the computer — you can simply go online to use a browser-based slicer. You can even access these options from your iPad’s browser, which makes it helpful for those who use CAD software on an iPad and want that same mobility for their slicer.
However, these online programs may lack some of the more robust features of downloadable versions, and you need an internet connection to use them.
SelfCAD
Pricing: Free plan; paid plans start at $11.99 per month, billed annually
Supported platforms: Browser, Windows, Mac
Where to access: selfcad.com
Key features: 3D modeler and slicer, browser based
SelfCAD is a browser-based 3D modeler and slicer in one, making it a unique addition to our list. While we’ve covered its pros and cons as a modeler in our Top CAD software for 3D printing article, its key feature is its ability to model, slice, and generate G-code, all in one program. Basic modeling and slicing capabilities are available in SelfCAD’s free plan, with paid plans offering more modeling and rendering features if you need them.
AstroPrint
Pricing: Free plan; paid plans start at $9.99 per month, billed annually
Supported platforms: Browser, iPad app
Where to access: astroprint.com
Key features: Browser based, printer monitoring, AI 3D model generator, broad printer compatibility, iPad slicer
AstroPrint bills itself as more than a slicer — you can generate 3D models with a prompt and monitor multiple prints at a time. If you want the ability to slice your models right in your browser, without downloading any software, AstroPrint is a great option, though it doesn’t have as many customizable settings as desktop options like OrcaSlicer or Prusa Slicer. It also has an iPad app you can use for slicing and monitoring prints.
The website offers a full list of 3D printers it’s currently compatible with. The free plan limits the number of users and printer connections, but should be fine for home users.
Kiri:Moto
Pricing: Free
Supported platforms: Browser
Where to access: Kiri:Moto website
Key features: Browser based, processing done in browser, supports CNC milling and laser-cutting toolpaths in addition to FDM
Kiri:Moto is another online slicer with a big differentiator: in addition to supporting FDM 3D printing, it can also generate toolpaths for CNC mills and laser cutters. It’s free and open source, and has options for configuring layer height, infill, supports, temperature, retraction, and other settings.
Using slicer software
If this is your first time using a slicer, follow these basic instructions to get your model ready to print.
1. Download your slicer software
If you’ve chosen a desktop-based slicer software, go ahead and download it from the manufacturer’s official site. Install the software following the program’s instructions for your operating system. For online slicers, go to the company’s website to get started.
2. Export your model
In your 3D modeling application, follow instructions to export your model. Slicers support certain types of files that represent geometry as a bunch of tiny triangles called “mesh.” Some of the most common file types include:
Choose one of these options (we recommend 3MF or STL) and click Export. The file will download to your computer.
3. Upload it into your slicer program
Open your slicer software. You should see an option to import your model, either in the “File” dropdown menu, or by dragging and dropping it into the program.
4. Check the orientation
Your 3D model will appear in the slicer, and you’ll have a chance to rotate or flip it to change the orientation. Most slicers have an auto-orient feature that will take into account overhangs, supports needed, print time, and contact with the build plate. That’s a good place to start, but as you gain experience, you might find that you have a better idea for how to orient your model on the build plate. Generally, here are a few questions to help you decide your orientation:
- Does my model need supports? Can I minimize the use of supports? (more on what this is and why you need it below)
- How will this object be used? Will force be applied in a specific area or direction? (generally, layers running horizontally will be stronger than trying to apply force to vertical layers)
- Does my model have a large, flat surface that can come in contact with the build plate?
- Is my print very tall? Would laying it on its side help cut down on print time, without negatively affecting its strength?
5. Select your printer model and materials
Next, choose your printer model and the type of filament you’ll be using if your slicer has these presets available. The presets will help give you a good starting place for your first print. They’re well-tested and configured for reliability, so don’t feel like you need to make any changes to them just yet.
6. Add supports, if needed
Supports are not part of your model’s design. They’re added in the slicer program to help provide a support structure to parts of your model, like bridges or floating sections, as it prints. Otherwise, your 3D printer may have trouble creating overhangs, or bridges may droop as they’re printed. Many slicers will automatically generate supports where they’re needed, you just need to choose to add them.
7. Add infill
Most models aren’t completely solid or completely hollow on the inside. They have what’s called infill, a net-like support structure that adds some strength without using as much material or weight as a completely solid object would have. You can control what percentage of your model is filled with infill — generally, experts recommend 15% as a starting point, and no more than 40%. You do not need to design infill as part of your model, because it’s automatically generated by the slicer.
8. Add a brim, if needed
If your model doesn’t have a large, flat surface to adhere to the bed plate, you might want to add a brim to the bottom of your object. This involves adding wider layers around the base of your print. Like supports, this extra material is designed to be removed later.
9. Customize your settings (optional)
As you become more familiar with your printer, you might want to change some of the settings, like:
- Layer height — affects print time and surface quality (thinner layers means a smoother surface and finer details, but a longer print time).
- Shell thickness/number of walls — affects strength and print time (thicker outer walls make your model stronger, but use more material and take longer to print).
- Fill pattern — this affects the pattern of your infill (triangle and gyroid are the strongest).
- Speed — you may want to lower your speed setting as a troubleshooting tactic if something is going wrong with your print.
- Retraction — this pulls filament back into the extruder between sections where the nozzle needs to travel without extruding material. You can change retraction distance and speed, which is helpful if you’re getting thin, stringy material on your model
There are tons of other settings you can fine-tune, but these are some of the most common that might vary by print.
10. Slice and print
After you’ve gone through all your settings, click the “Slice all” or “Slice now” button (this can vary by program) and let the slicer do its magic. Then, you’re ready to send your file to the printer or export the G-code file and save it on an SD card or USB drive.