
Choose your 3D design software
Before you can start designing, you’ll need the right 3D modeling software. Let’s talk about design programs that help you create your printable models.
If you want to make your own designs, you’ll need to use special 3D CAD (computer-aided design) software to create a 3D model of what you want to print.
When choosing your software, you want to strike a balance between ease of use and precision. Some beginner-friendly modeling programs may lack the precision you need to create functional models. CAD programs often used by engineers have a steep learning curve but are precise enough for manufacturing.
We’ve broken down the most popular CAD software for 3D printing in our guide — check out the article for options that are best for beginners.
Consider the following factors (also covered in our guide):
- Ease of use: Which options will allow you to get started modeling quickly, without getting frustrated by too many features or a complicated user interface?
- Design strengths: Do you want to create a functional part mostly made of simple shapes, a design with curves, or an organic form? Some programs are better than others at different types of design.
- Parametric modeling: Some 3D CAD programs use a parametric modeling approach, which records each step of your design process. When you go back through your history and change parameters of your model, the rest of the model updates accordingly. This comes in handy when designing for 3D printing, as you’ll see below.
- Precision: Models for 3D printing must be manifold (also known as watertight), meaning they are solid bodies without any gaps or holes. Some modeling programs may produce less precise shapes that can lead to gaps, especially where two edges join.
- Export options: Your finished model will have to be exported as a file that is readable by slicer software. Look for CAD programs that can export 3MF, STL, STEP, and OBJ, which are the most common file formats.
- Training and tutorials: A program with built-in tutorials, an in-depth knowledge base, and training materials will help you learn quickly.
Best practices for 3D model design: Tips from a pro
Robert’s years of experience give him an advantage when it comes to designing 3D prints. But he always starts with the same basic principles, and encourages beginners to do the same.
Read on to learn his tips for designing functional parts and the questions you should ask to help you get started.
Start with function and fit, then add aesthetics
How you design something depends a lot on how you will use it. If you’re making a decorative figurine to put on your shelf, you’re going to have different requirements than a phone case that needs to fit your phone with exact cutouts for your camera and charging port.
Your first step when designing, before you ever put pencil to paper, is to think about your use case and the necessary components that are needed for your model to work. Robert thinks of this in terms of a “priority checklist.”
For a recent desktop fan design, Robert had two items at the top of his priority list: an electronic knob controller component with a USB port, and the fan blades. He knew he needed to design a frame that was the right size for those pieces.
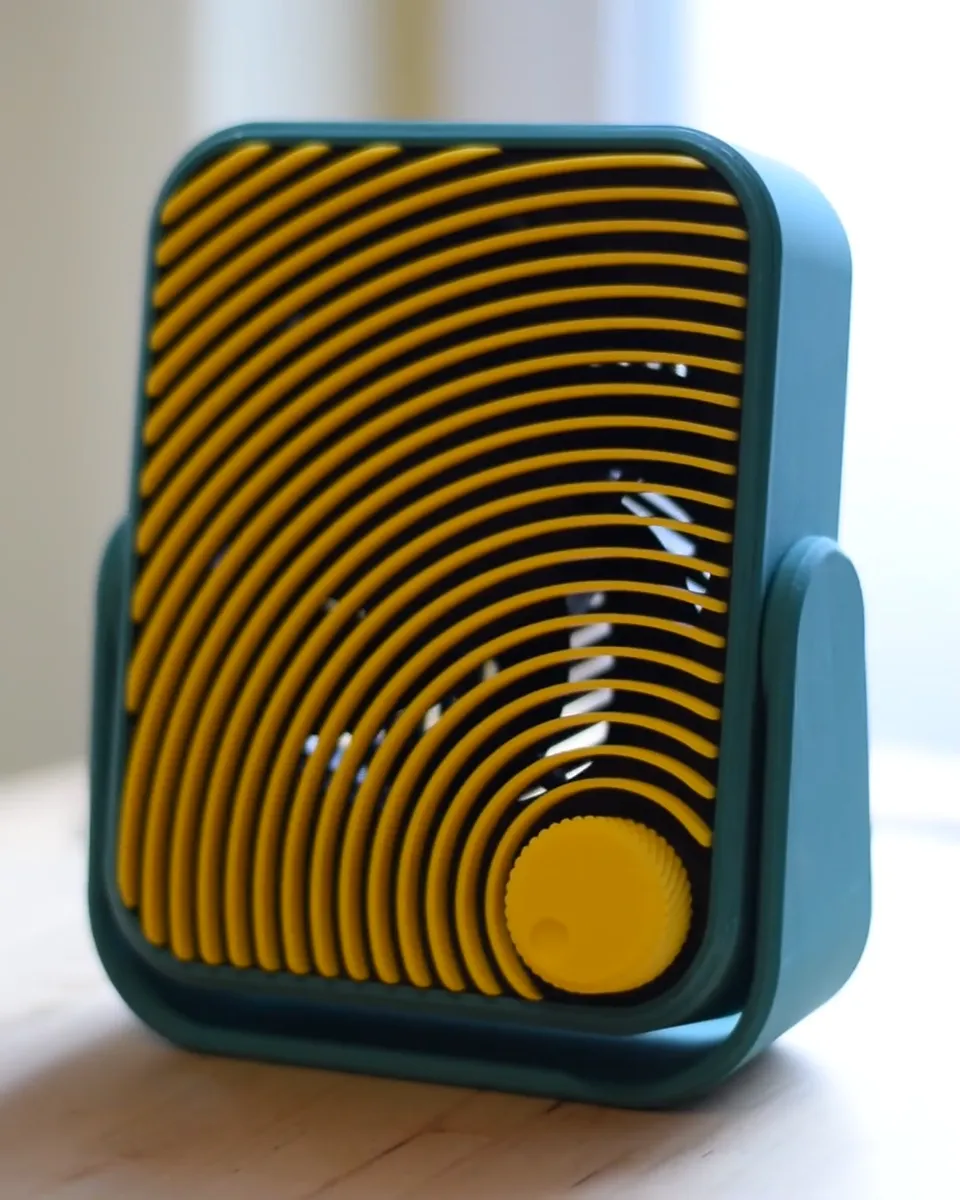
He measured the size of the small electronic component, created a rectangular slot in the frame slightly larger than the electronic piece, and printed just that section to test the fit. He made small adjustments in his design to create a snug fit, so the component could fit perfectly into the slot and the knob controller lined up with the hole.
For designing functional holes and slots, you need to consider tolerance, or the amount of allowed variation of a physical dimension in order for a part to function. “If you want to put a pin into a hole, you measure the pin and make the hole slightly bigger. But the fit will depend on the material and 3D printer,” Robert says. “Once you know your printer and have experience, you might know that you just have to add 0.2mm to get the correct tolerance, but it always helps to check by printing and testing the fit.”
After he had those functional sections designed correctly, Robert knew he could move on to the aesthetic parts of the design without worry. He could get creative and experiment with different styles knowing that he wouldn’t be taken by surprise by a part not fitting at the end.
Questions to ask
- Is the finished design more about aesthetics or function?
- What does this design need to be functional? Screw holes, electronic components, cutouts that need to line up, a specific size, a snug fit? What is my priority list of essential components?
- What is the size of the finished model?
- Does the finished object need to fit into something or hold something of a particular size?
Think about how the object will be printed, layer by layer
3D printing has some unique qualities and limitations that make it different from other manufacturing methods like CNC machining or injection molding.
“There’s a difference between printing something flat versus printing it upright. You have to consider this before you start designing, because if you understand the limitations, you can design around them,” Robert says. “You can optimize your model to be stronger and have a nicer quality.”
Choose the right orientation for a stronger model
For instance, printing an object layer by layer introduces weaknesses between the layers. If you have a functional part that needs to be strong, think about where force or pressure will be applied to the part. You’ll want to orient your model so that the part that needs to be strongest is printed flat.
Print holes flat for better precision
The layer-by-layer process can also cause issues when your part has negative space. For example, if your model has screwholes, and those holes are printed upright, the top of the hole may warp slightly as the filament bridges the gap where the hole is. As a result, your hole may not be as precisely shaped as you’d like. For a more precise circle, you could orient your design so the side with the holes are printed flat.
Orient your model to reduce supports
Similarly, if your object has overhangs or bridges, your printer might need to print supports beneath them so the filament has something to hold it up. Those supports are removed after the print is complete. Sometimes, you can address that limitation by changing the orientation of your model. If you flip it over so the overhangs lie flat, you might not need to use supports. Think of a T shape — turning it over and printing it upside down creates a smooth, flat top without the use of any supports.
Questions to ask
- What parts of my design need to be strong enough to hold up to force, pressure, or constant wear?
- If I turn my model onto its side or flip it upside down, will that orientation help make it stronger?
- If my model has overhangs, is there a way to change the orientation so supports aren’t needed?
- If my model has holes or slots, can I orient it so that these pieces print flat?
Break down an object into several parts
As Robert mentioned, holes or slots will print more precisely if they’re laid flat. But what if that orientation means sacrificing strength on another section of your model?
Thinking about your final object as one piece can be limiting and add complexity to your project. Robert suggests breaking down your design into pieces, especially if it has functional parts. That way, you can design each functional piece in a way that optimizes its strength and durability.
Robert’s desktop fan design has a ratcheting system that allows the fan to be positioned at different angles. He opted to create the gear system as two separate pieces that snap into the frame. He printed the gears flat so they could be stronger, holding up to the wear of turning and holding the fan in place.
“If it was printed as part of the frame, the vertical layers would make the gear system weaker,” Robert explains.
Questions to ask
- Does my design have functional parts, like gears, that should be printed flat?
- What parts of my model might make sense to print separately?
- How will these pieces be attached later? Have I tested them to make sure they fit or that the screw holes line up?
Don’t be afraid to test and iterate on designs
As an industrial designer, Robert is used to creating many different iterations of an object. When he started 3D printing, he learned that he could use his printer to quickly test pieces for fit, function, and comfort before committing to a design.
He recommends printing early and often, seeing these tests as part of the process. Print just the section that needs to be tested to save time and material.
“As soon as there is something I can test, I print a small portion of it to check fit and see tolerances. If it has some integrated electronics, I’ll test it separately so I can be sure it will fit in that shape. I don’t want to find out later, when there’s a more complex design, that I missed a detail and need to redesign it.”
Sometimes, Robert will design an object and use it for a few days to figure out its issues. Then, he’ll tweak the design and print a new version. “Experiment with it. Do different things. Don’t expect to have a perfect model the first time,” he says.
Using 3D CAD software with parametric modeling capabilities is helpful for this iterative process. It allows you to edit a dimension or detail and updates the rest of your model automatically to maintain design intent.
Questions to ask
- What parts of my model do I want to test for fit and tolerance?
- What parts of my model should I print to test comfort or ergonomics?
Get inspiration from other models
Even if you have your heart set on designing your own model, it helps to get inspiration from what others are doing.
Check out model hosting sites like Makerworld, Thingiverse, or Printables, searching for the object you want to make. Look at other models to see how their creators have built the functional parts. Even if you don’t use the whole design file, you might want to get ideas from just the gear system.
You can find inspiration from anywhere, not just 3D printed design files. Furniture sites or social media feeds are a great place to get ideas or narrow down a particular style, but just be aware of how the limitations of 3D printing may affect your design.
Questions to ask
- What do I like about this particular design? What would I do differently?
- What style do I want my final design to be? Minimalist, classic, modern, industrial?
- How did this designer approach the moving or functional parts of a design?
- How was this model constructed? Does it have several pieces that fit together, or is it one piece?
Designing 3D printed objects to sell
If you’re planning on mass-printing and selling your creations, you might approach design differently than if you plan to print one object for personal use.
“If you print one and there is a small issue, you can sand it down and it might take an hour. But if you want to produce hundreds, it’s worth it to solve that small issue or optimize your design to save time and material,” Robert says.
Here are a few tradeoffs to consider:
- Printing your model in multiple pieces may be helpful for creating higher-quality, more durable parts, but assembling those pieces takes time.
- Sanding, painting, and other processes can hide errors and create a more finished-looking product, but add to your time and material costs.
- Multicolor prints look great, but you might have to account for filament waste and the time and effort involved in manually switching filaments (unless your printer system automatically does this).
Next steps
Ready to start designing? Download Shapr3D — it’s CAD that’s easy enough for beginners with the precision you need for 3D printing. Try it out on iPad (with the Apple Pencil), Windows, or Mac, and you’ll be on your way to your first model in 15 minutes.