


Prototyping should make up 70% of your design process
In college, design students learn to start by drawing and 3D modeling, and then jumping straight into creating an expensive prototype that doesn’t work.
After falling into this trap myself, I realized that immediate testing is a must. I’ve redesigned my process, and now with each of my concepts I use low-cost materials like paper, bent metal or wooden sticks to create ‘crappy prototypes’ with a lot of insight.
As a rule, I spend almost three-quarters of my time iterating different models
— it’s the backbone of my thinking and ideation process.

Like all things that take time, professional prototyping is also the phase that is often minimized, in order to push products out faster. Both startups and engineering-heavy teams are often guilty of making this mistake. Down the line, they waste thousands of dollars manufacturing products that haven’t been optimized to use the ideal material type, thickness or dimensions.
My aim with this paper is to demonstrate the higher quality, manufacture-ready product concept that can be refined by taking the time to create and learn from different modeling methods.
About the designer

Adam Miklosi is a Budapest-based industrial designer.
His previous work includes the industrial design concept for ‘Dab,’ an ECG holter patch. Currently, he’s working on his own product, Poizo, alongside various freelance projects.
Adam frequently challenges himself to rethink every day objects. This keeps him focused and always on the lookout for innovative solutions. The project that he documented for this paper, named Slē, is just this sort of redesign.
In this challenge, he reimagined the traditional sleigh aiming to elevate the vehicle from a toy to a functional design object.
Introduction
A 2019 study revealed that 67% of product designers and manufacturing professionals want to change their early stage design processes, before significant investments are made in manufacturing tooling.
By evolving better early design practices - including a versatile toolbox of low budget prototyping methods - you can:
- Cut manufacturing costs
- Iterate stronger, more creative product designs
- Eliminate concept revisions at the manufacturing stage
This paper follows a professional industrial designer’s prototyping and DFM process, as they fine-tune a product concept before manufacturing a full-scale model. Each stage includes a practical look at how and when you should apply the method to your own process.
All the prototyping processes described in the paper cost a total of 200 USD, including 3D printing, laser cutting, creating molds and material testing fees.
Why prototype?
Extensive prototyping is a cost-effective way to design manufacture-ready concepts
“At the beginning of a project, there are many uncertainties about how something will work, what it will look like, and whether it addresses the problem. Designers use prototypes to resolve these uncertainties, iterate on their design, and converge toward a design that best addresses the problem. This means that every prototype has a single reason for being: to help you make decisions.” - Amy J. Ko
The practical explanation for prototyping is budget. Taking into account manufacturing methods during the design process and discussing details and optimal materials with manufacturers saves costs.
According to leading metal 3D printer company Markforged, “around 70% of the manufacturing costs of a product can be derived from design decisions like materials and manufacturing method. Focusing on design optimization reduces the cost of manufacturing.”
Concept work produces more creative results
On a theoretical level, concepting results in stronger, more creative designs. Conceptualizing before you create a 3D model will give you an opportunity to view your work from a design standpoint, instead of a modeling standpoint. By not limiting your creativity to CAD, your end result will be more innovative and well thought out.
“Unfortunately, the result of losing the pre-CAD conceptualization stage of design means cutting out arguably the most vital stages of the process. By using the pre-CAD process, the designer’s role still requires working through the problem solving process and staying closely connected with the traditional steps of ideation that are at the core of engineering design.” - Polly Brown
Prototyping is an essential tool for a lean design process
Prototyping helps identify limitations and possibilities. It is a great method for communicating with manufacturers and clients from the get go, in the spirit of lean methodology.
Some prototyping methods that support a rapid, iterative development process include:
- Raw idea concepts that filter out the best parameters of the design and help define the form language of your design
- Digital sketches, which are effective for generating useful feedback from clients
- CAD models that help validate your design and support decisions on the specifics of key parameters
- Photo-realistic rendering, which lets you communicate your designs to investors and end users
The design brief
Adam will take over now, and will explain the project in his own words.
Short history of sleds
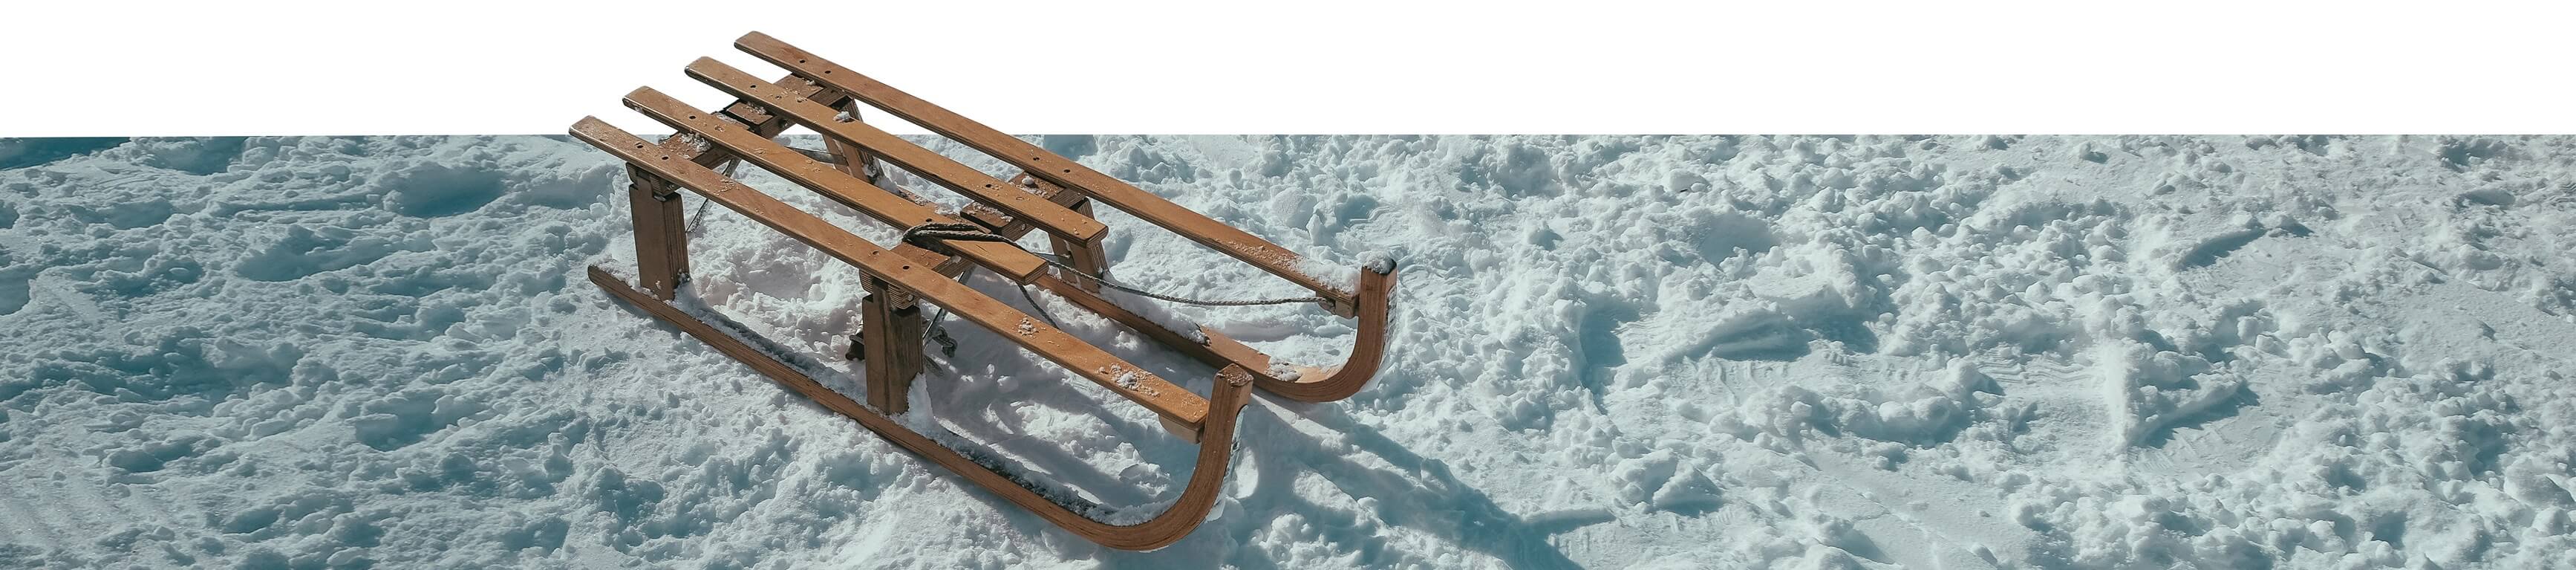
Sleds have been used since prehistoric times. Today they continue to be used in sports, for special occasions and as a recreational activity. The common design principle shared by every sled type is their structure, which is mainly a result of the material that they’re traditionally built with. When we think of sleds, an image of a wooden structure with two sliding feet sheathed in metal ‘blades’ immediately comes to mind.
Target group
This wooden structure has been developed over centuries to glide efficiently over snow using the principles of physics. Nowadays, sleds are widely used as a winter pastime by both children and young adults who live far from ski slopes.
The challenge
I challenged myself to design a sled that would fit this entire range of potential users. I focused on both the user experience and their motivation for sledding. My goal was to take sleds out of the ‘toy’ category, by defining a form language that was playful yet elegant.
The expected result
A recreational sled that could be considered a stylish, high-quality piece of equipment suitable for both children and adults.
Method 1.
Digital and hand-drawn sketches
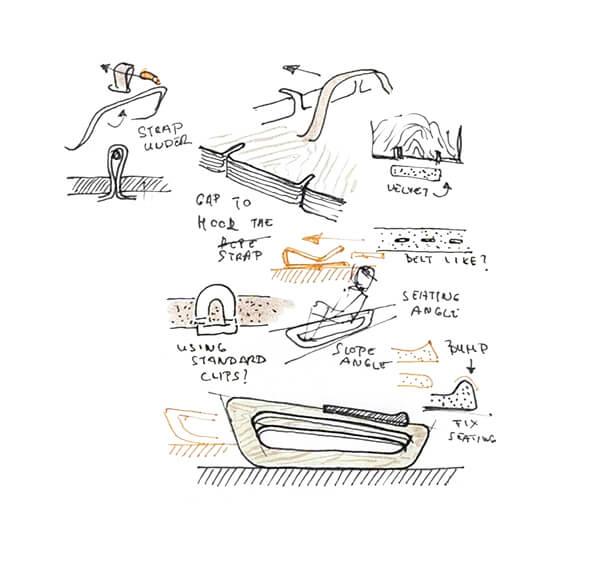
I began work with the ideation process. The aim of this phase is to come up with a bunch of raw ideas that can be used for detailed development later on. Usually, ideation involves brainstorming designs, structures and mechanisms, or creating moodboards and researching materials.
At this point in the process, I never limit myself. Everything that comes to mind gets recorded, no matter how extreme or innovative.
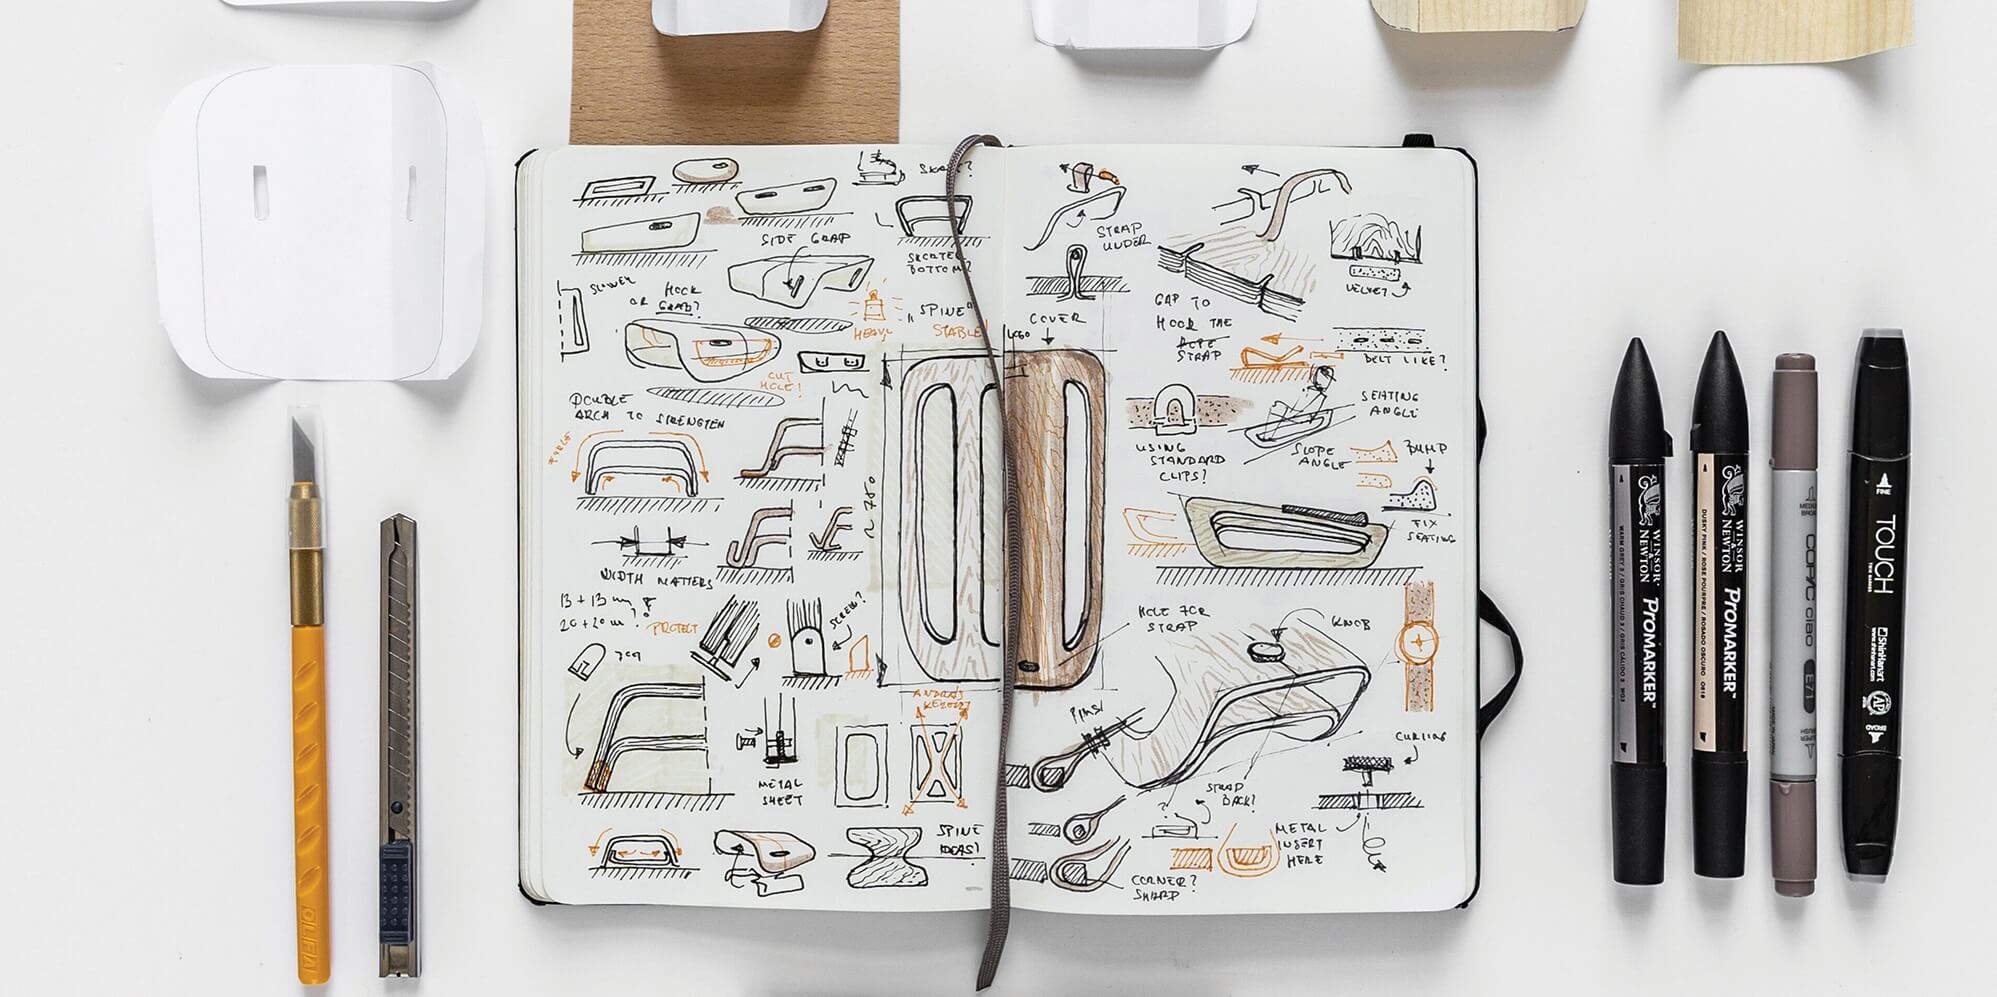
For this particular project I skipped traditional “brainstorming.” Instead, I focused on researching how to work with and apply bent wood as a material. Using the challenge description as my brief, I quickly generated holistic and detailed sketches.
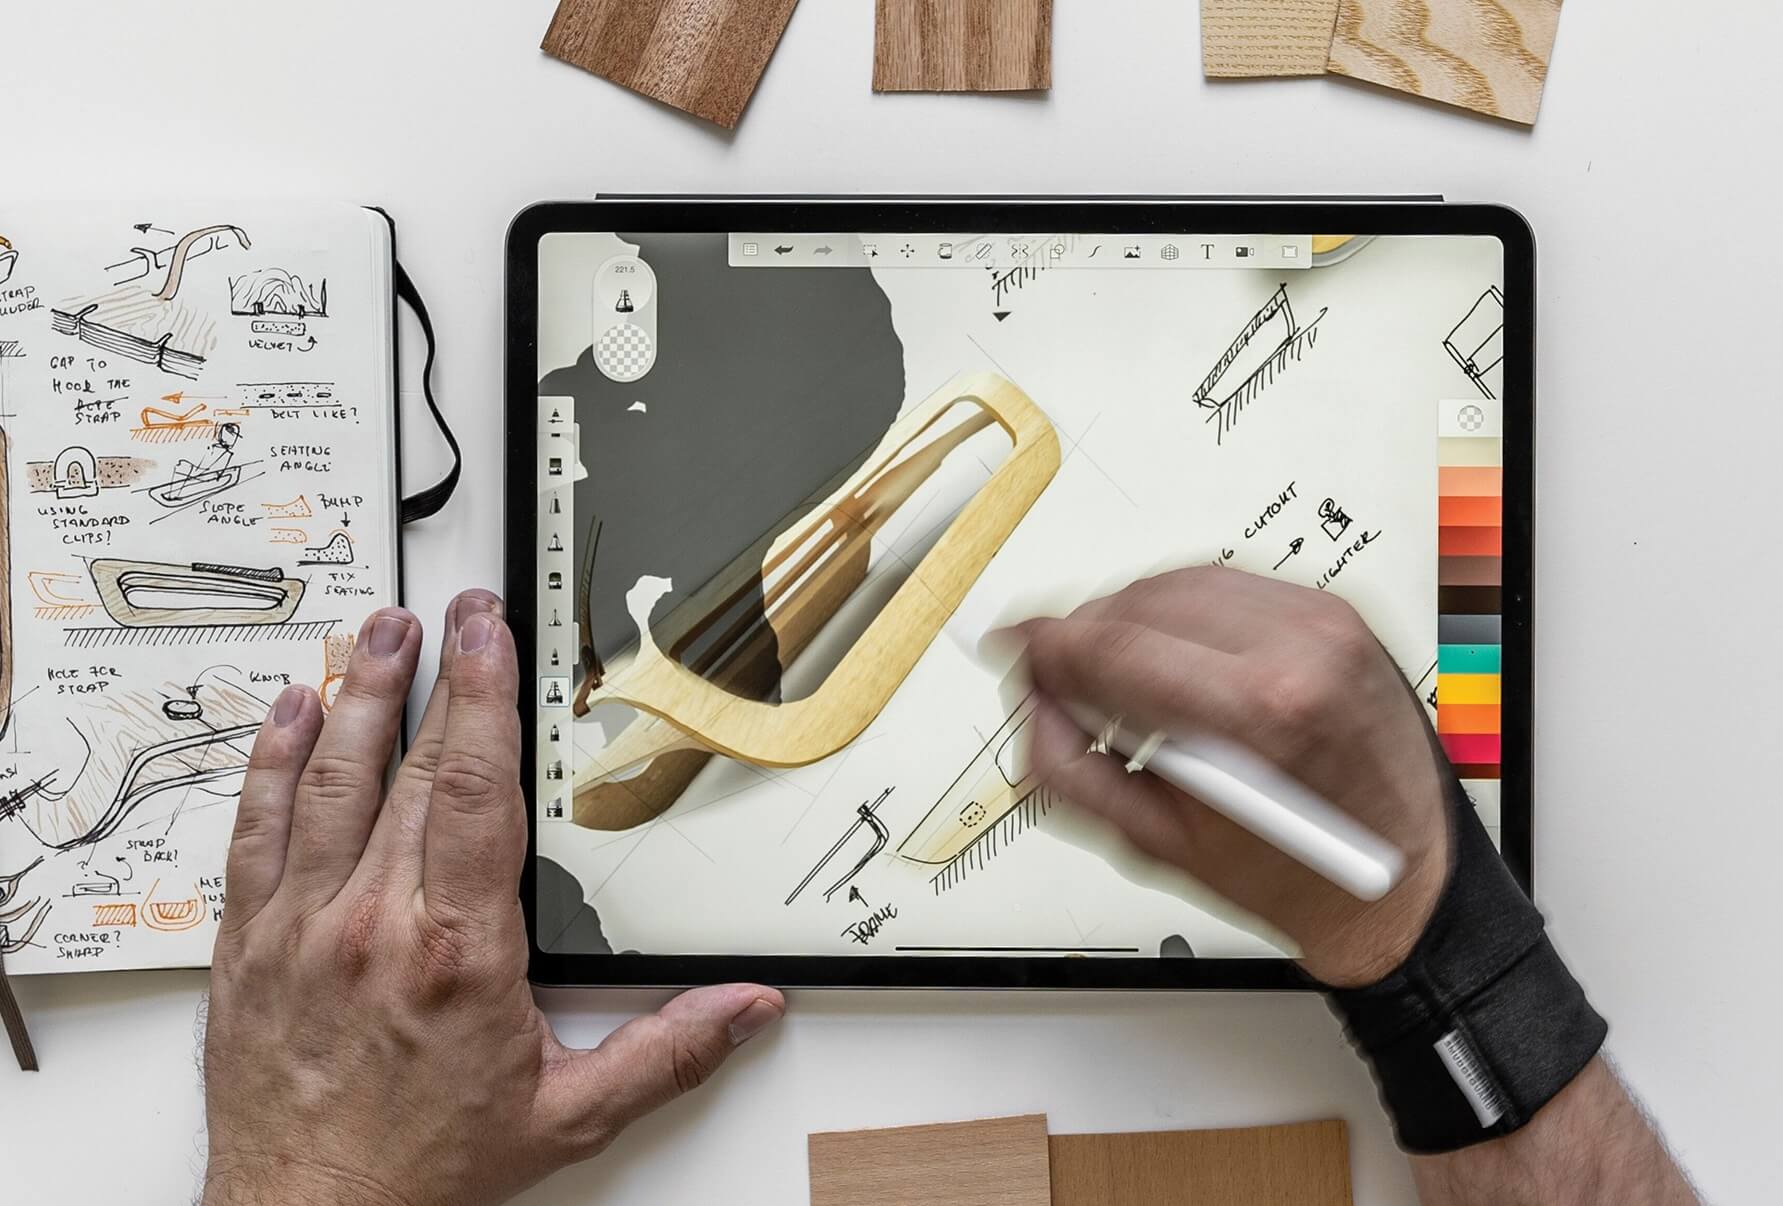
Pencil and paper sketches are perfect for quick idea notes. Digital sketches are ideal for detailed development and also to present to potential consumers.
I used my sketches to validate my ideas and collect feedback on Instagram. This way I was able to test basic assumptions with potential end users.
Method 2.
Paper prototypes
In addition to drawing concepts, I also created rapid mockups with paper to test some of the ideas in 3D. I chose paper because it is cheap, fast and simulates the qualities of pliable wood quite closely.
Bent plywood technology determined the form language of the project and I quickly went to simple paper proto types to get a couple of raw, working concepts. After identifying the most promising details I began work on the sled’s form language and product identity.
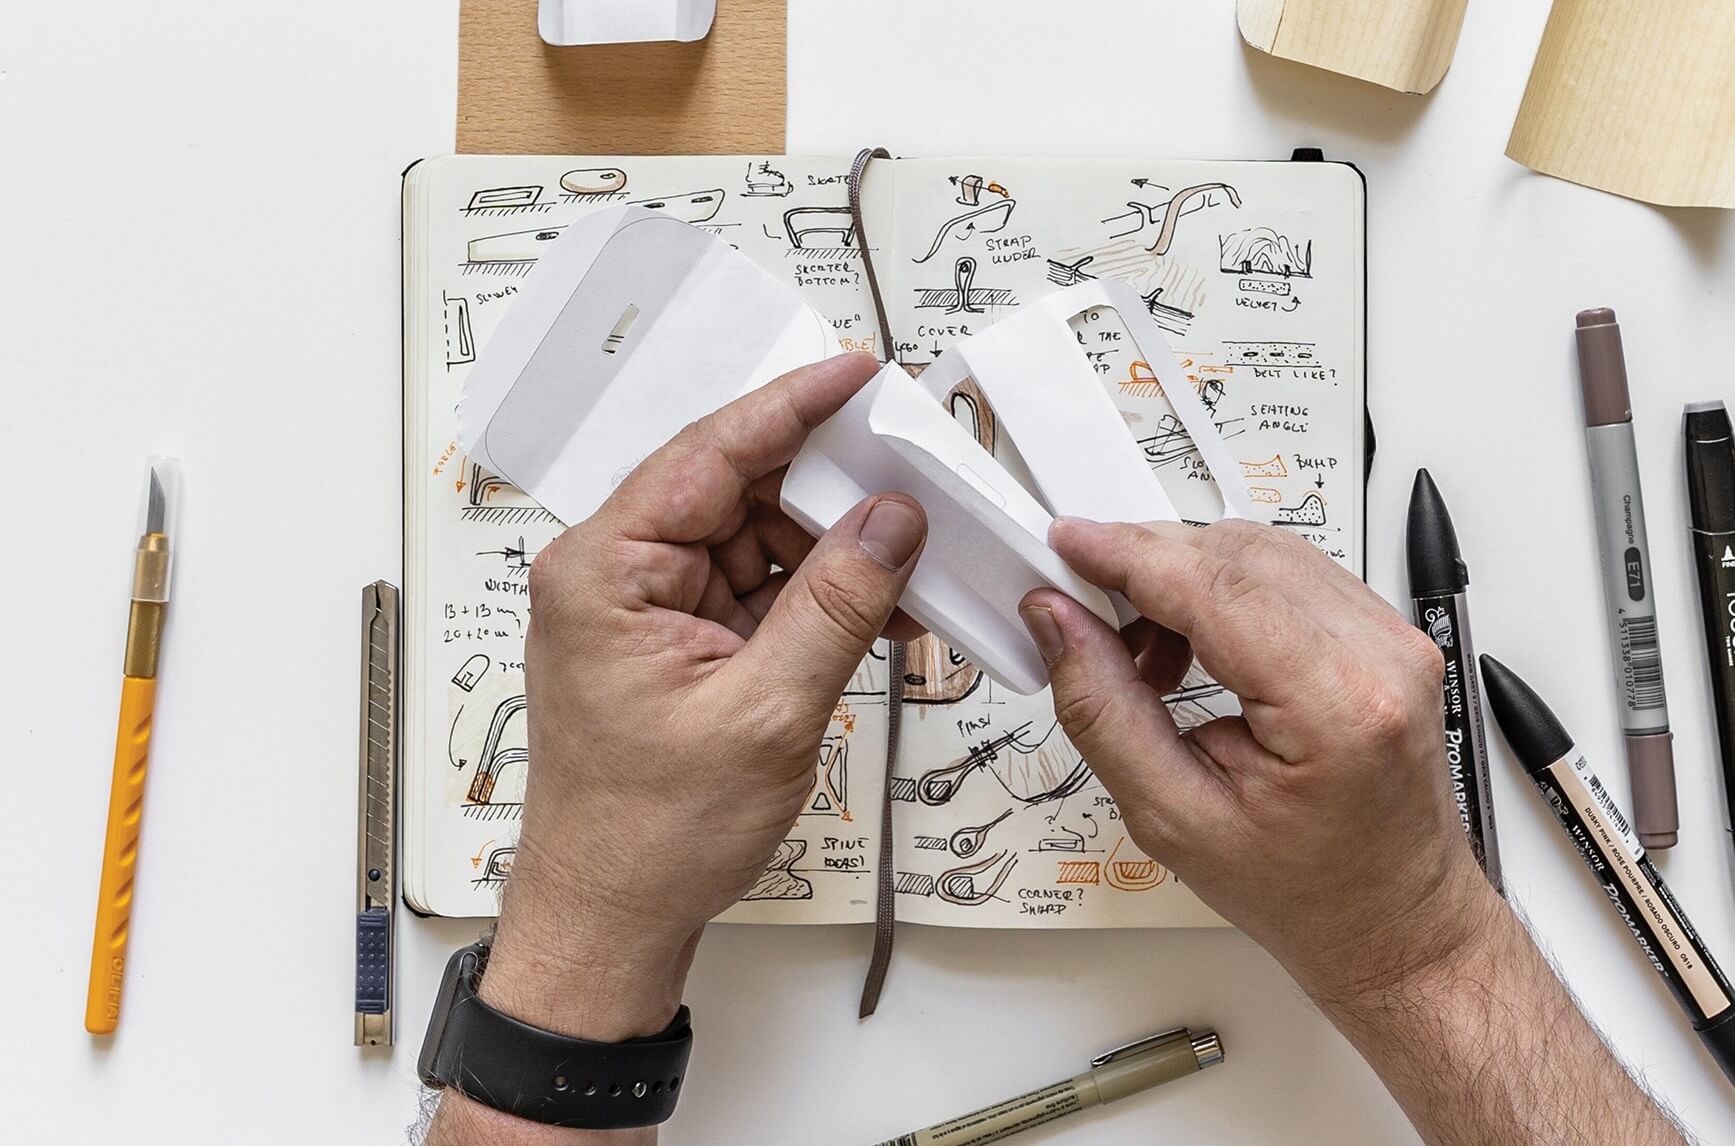
This is the easiest way to get instant 3D feedback. Use cardboard and colored paper to immediately get a feel for the CMF process later on.
I digitized my strongest hand drawn sketches and refined the proportions, dimensions, material texture and color. These were presented to potential consumers and manufacturers to gain as many insights as possible.
Design Tip - Presenting your first ideas
Presentation quality matters a lot, especially if your client has no creative background. On my sketches I prefer to show the big picture design with additional doodles as “side notes” to answer any detailed questions.
Digital sketches are great because clients understand them as a step in the process, and not as an end result. The final designs are always presented as photo-realistic renders.
Method 3.
3D design prototypes
Next, I visualized the strongest ideas in CAD to validate structural details. Using this method, I could validate things like radius values, material thickness and the structure’s general proportions.
3D mockups are great for coming up with an infinite number of iterations, then checking and comparing them from different angles to inform decision making.
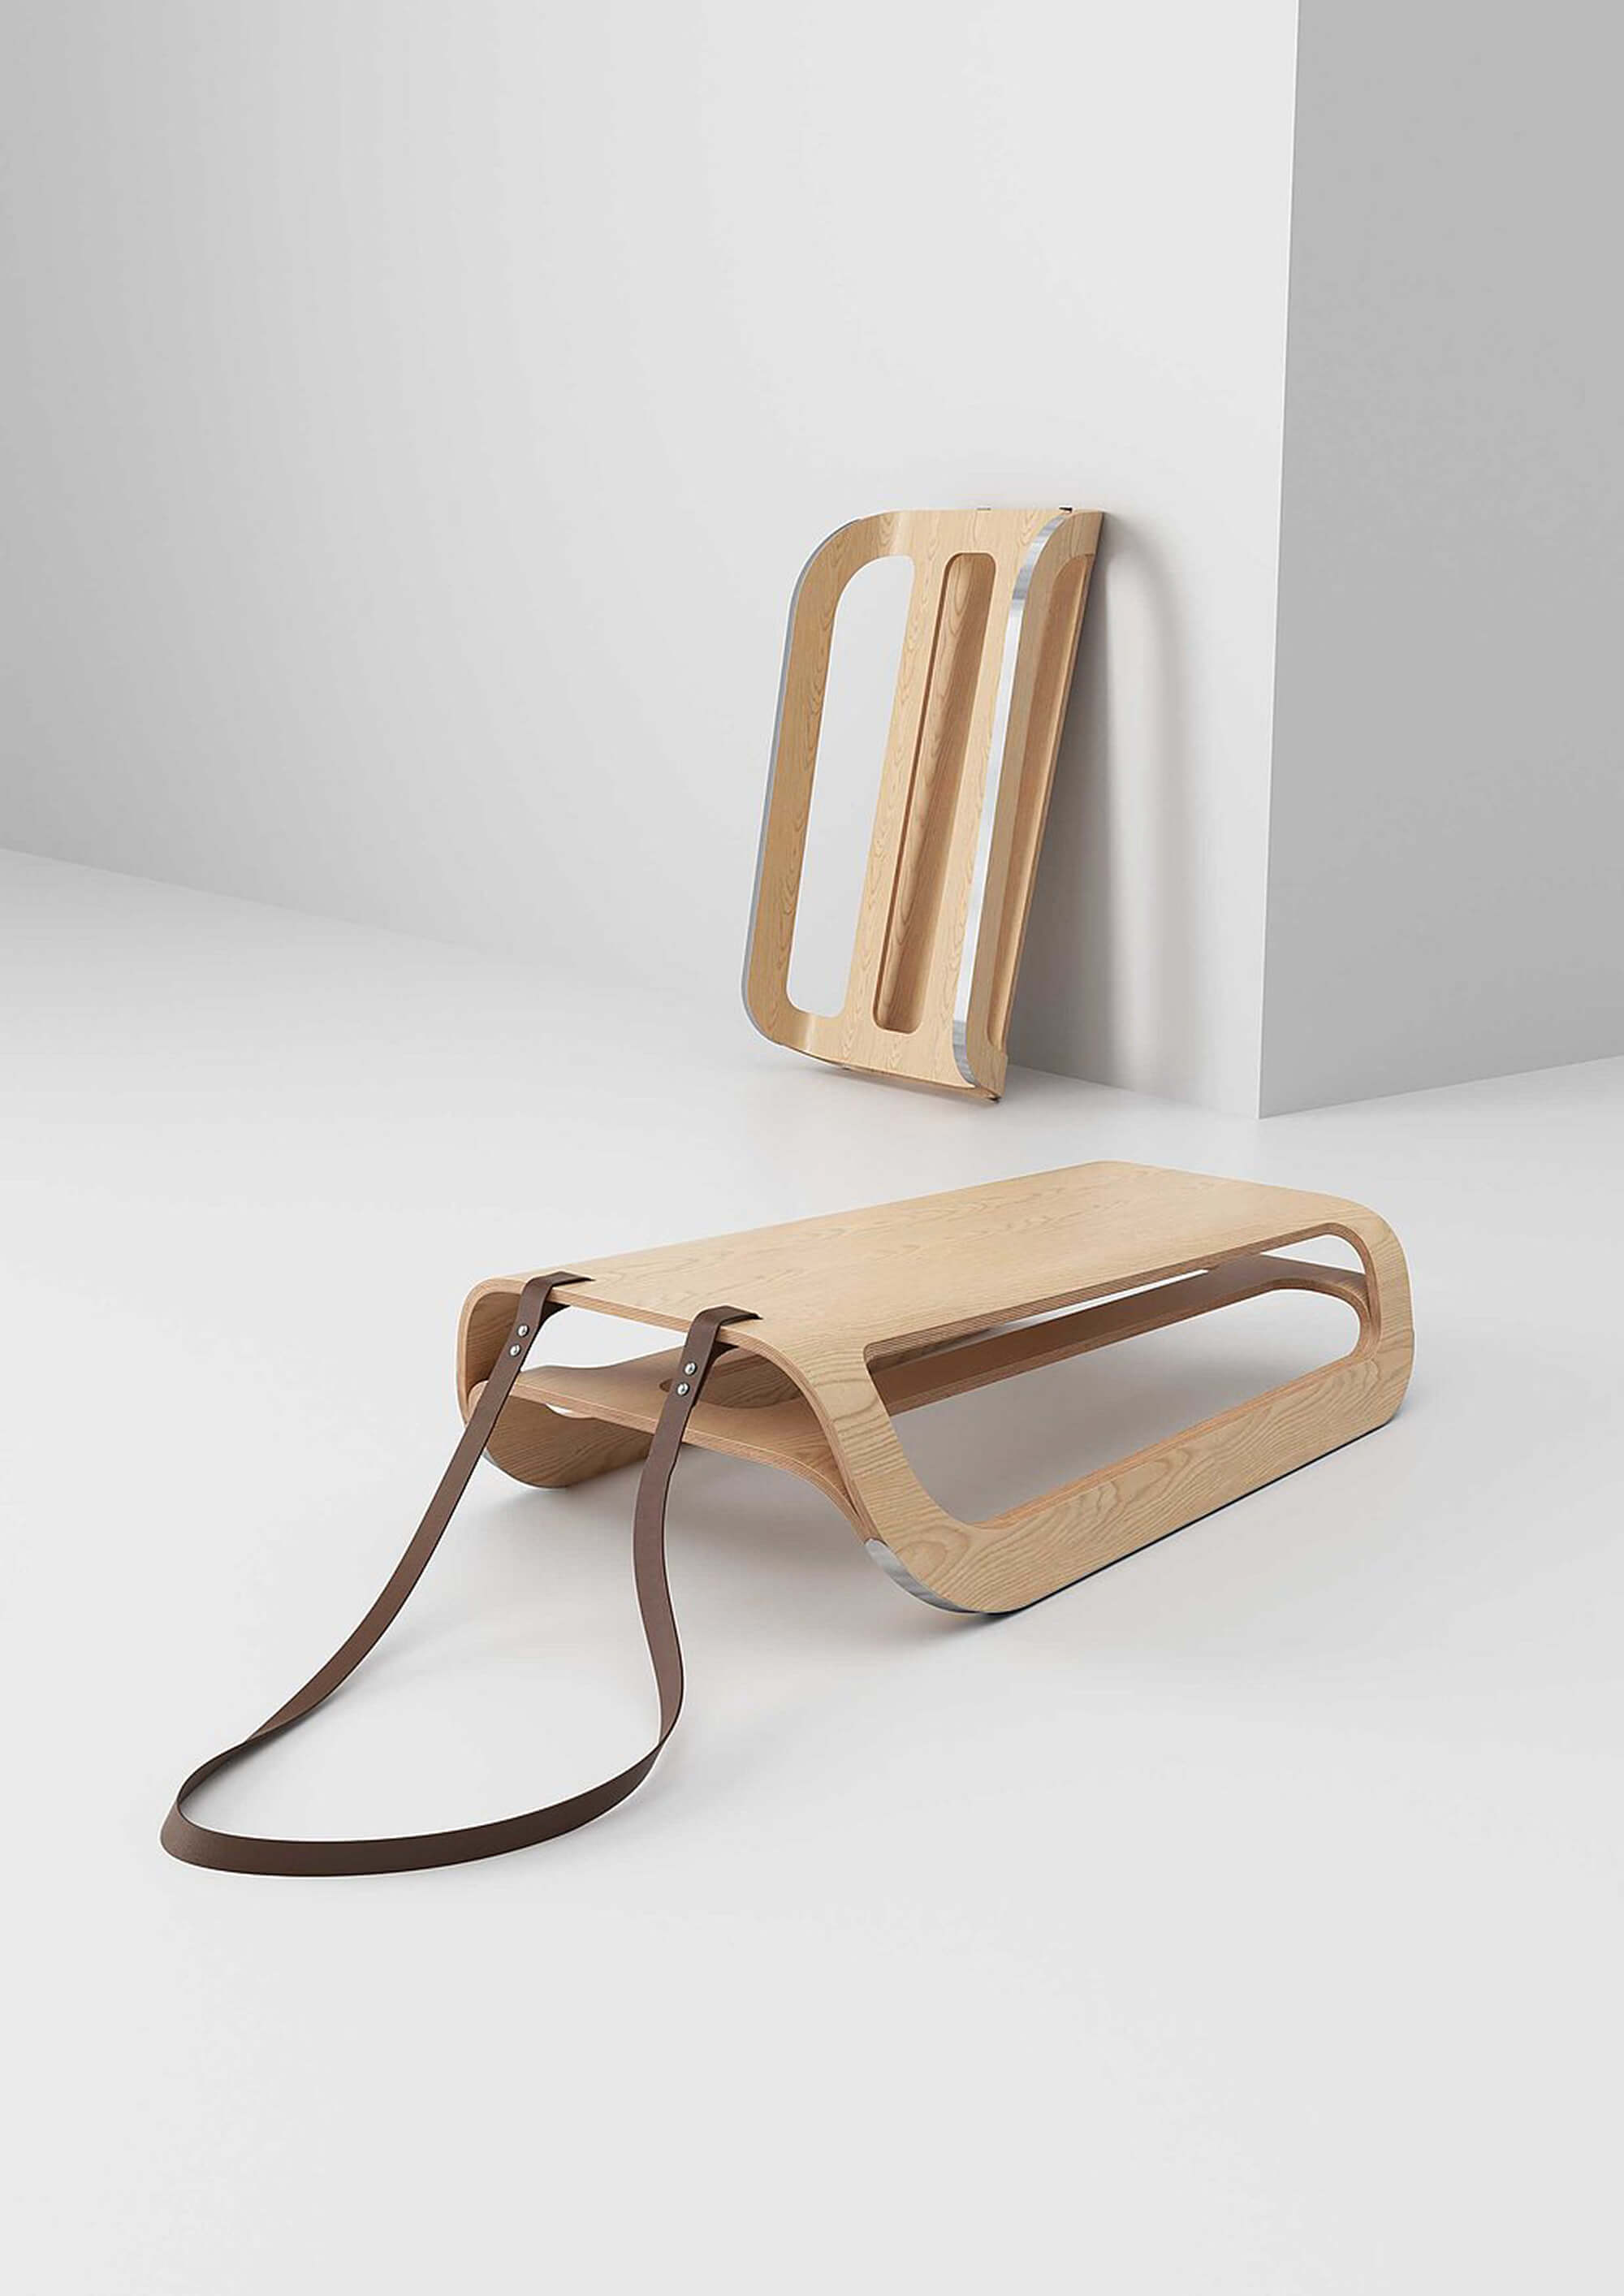
From the get go, I decided to center Slē’s identity around bent plywood structures. This type of wood has a smooth surface and an accurate, even thickness. It also comprises the high impact resistance necessary to withstand outdoor conditions. Material selected, there were a couple of key structural elements that remained to be tested.
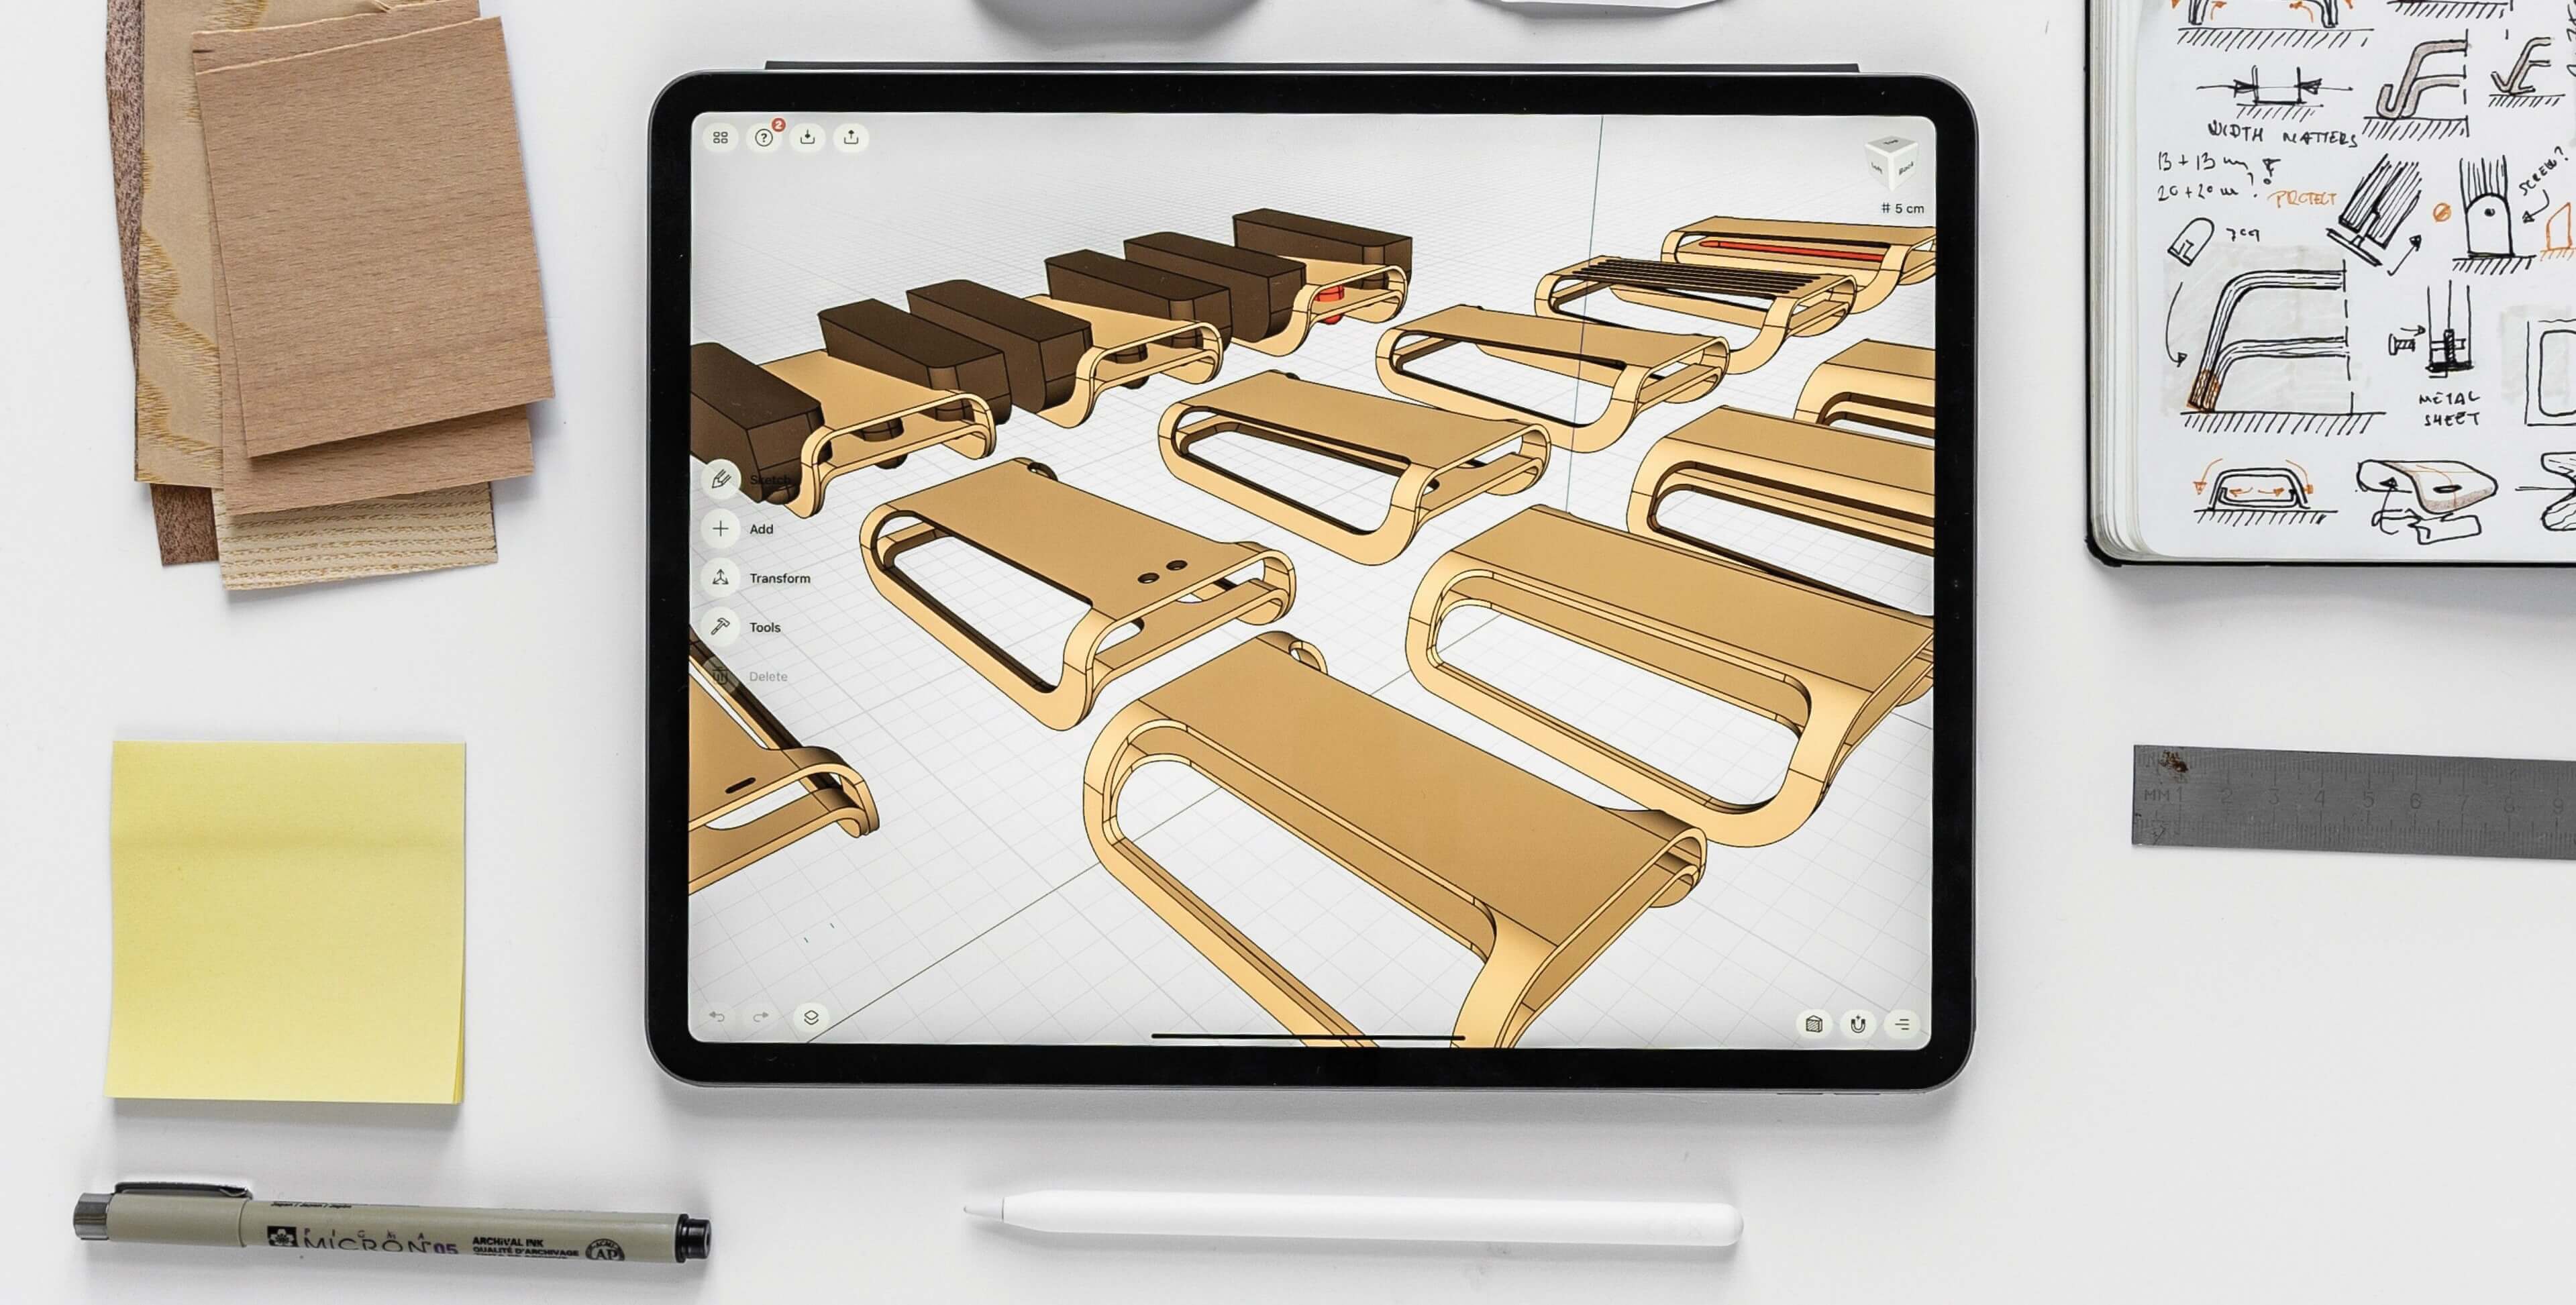
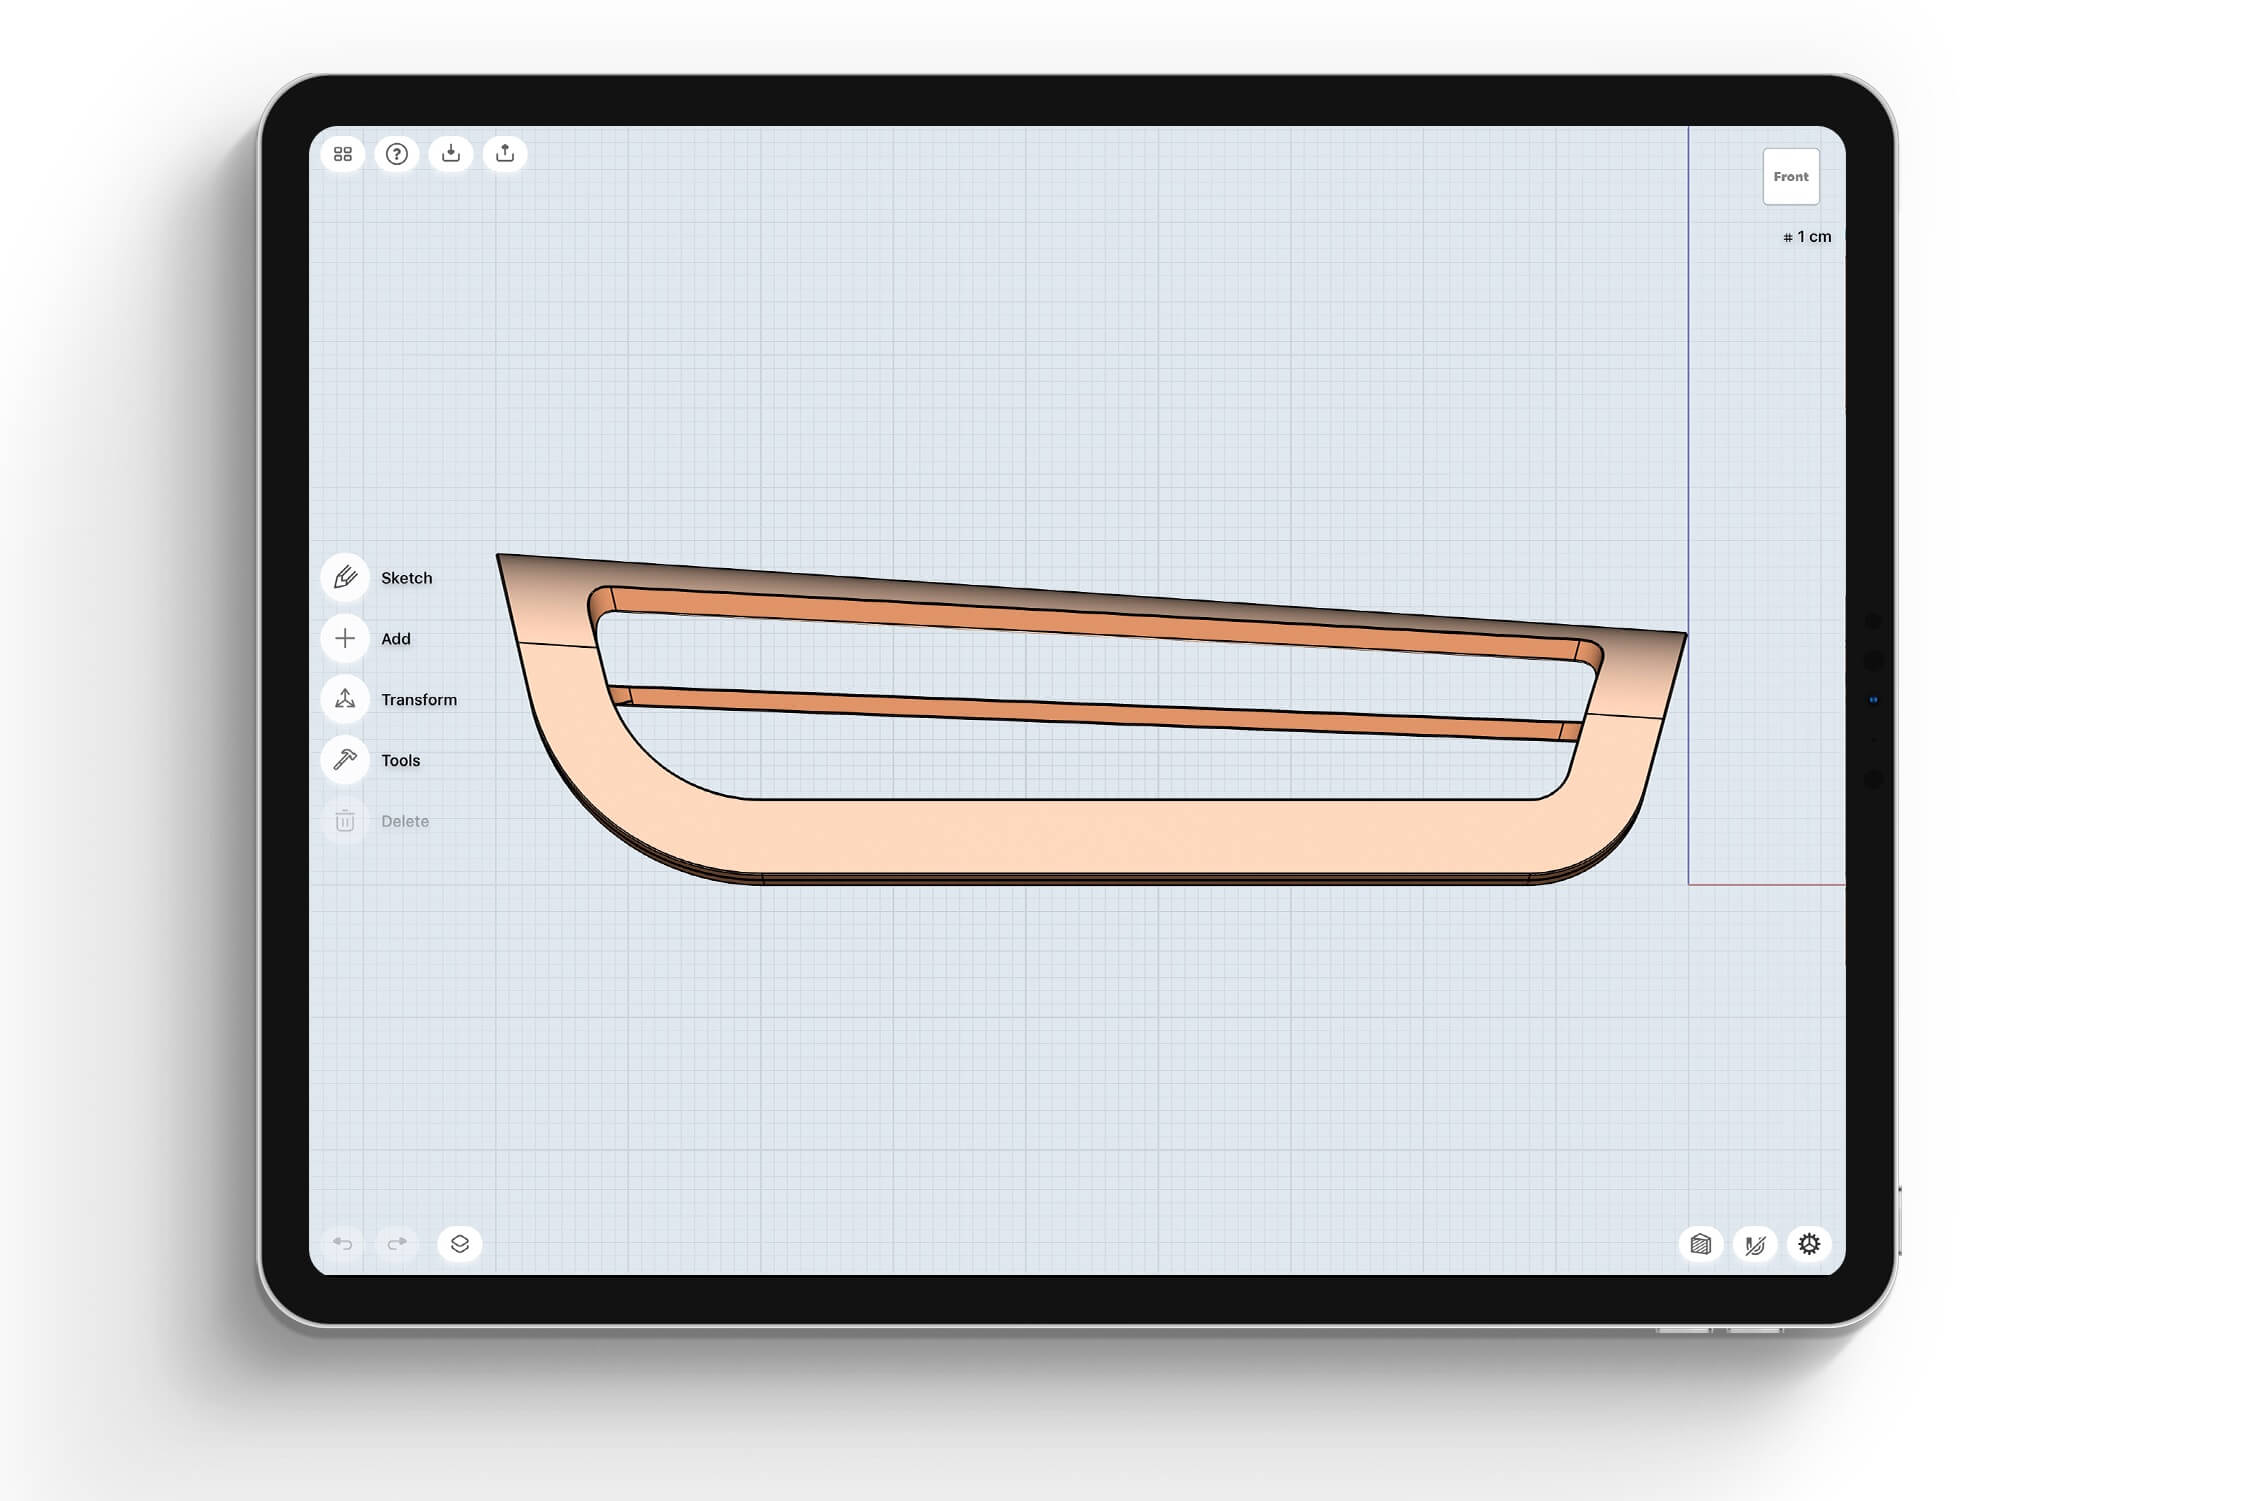
The tilted seat and frame were specifically designed for the slopes, providing a convenient seat and maneuverability on incline grades up to 25%.
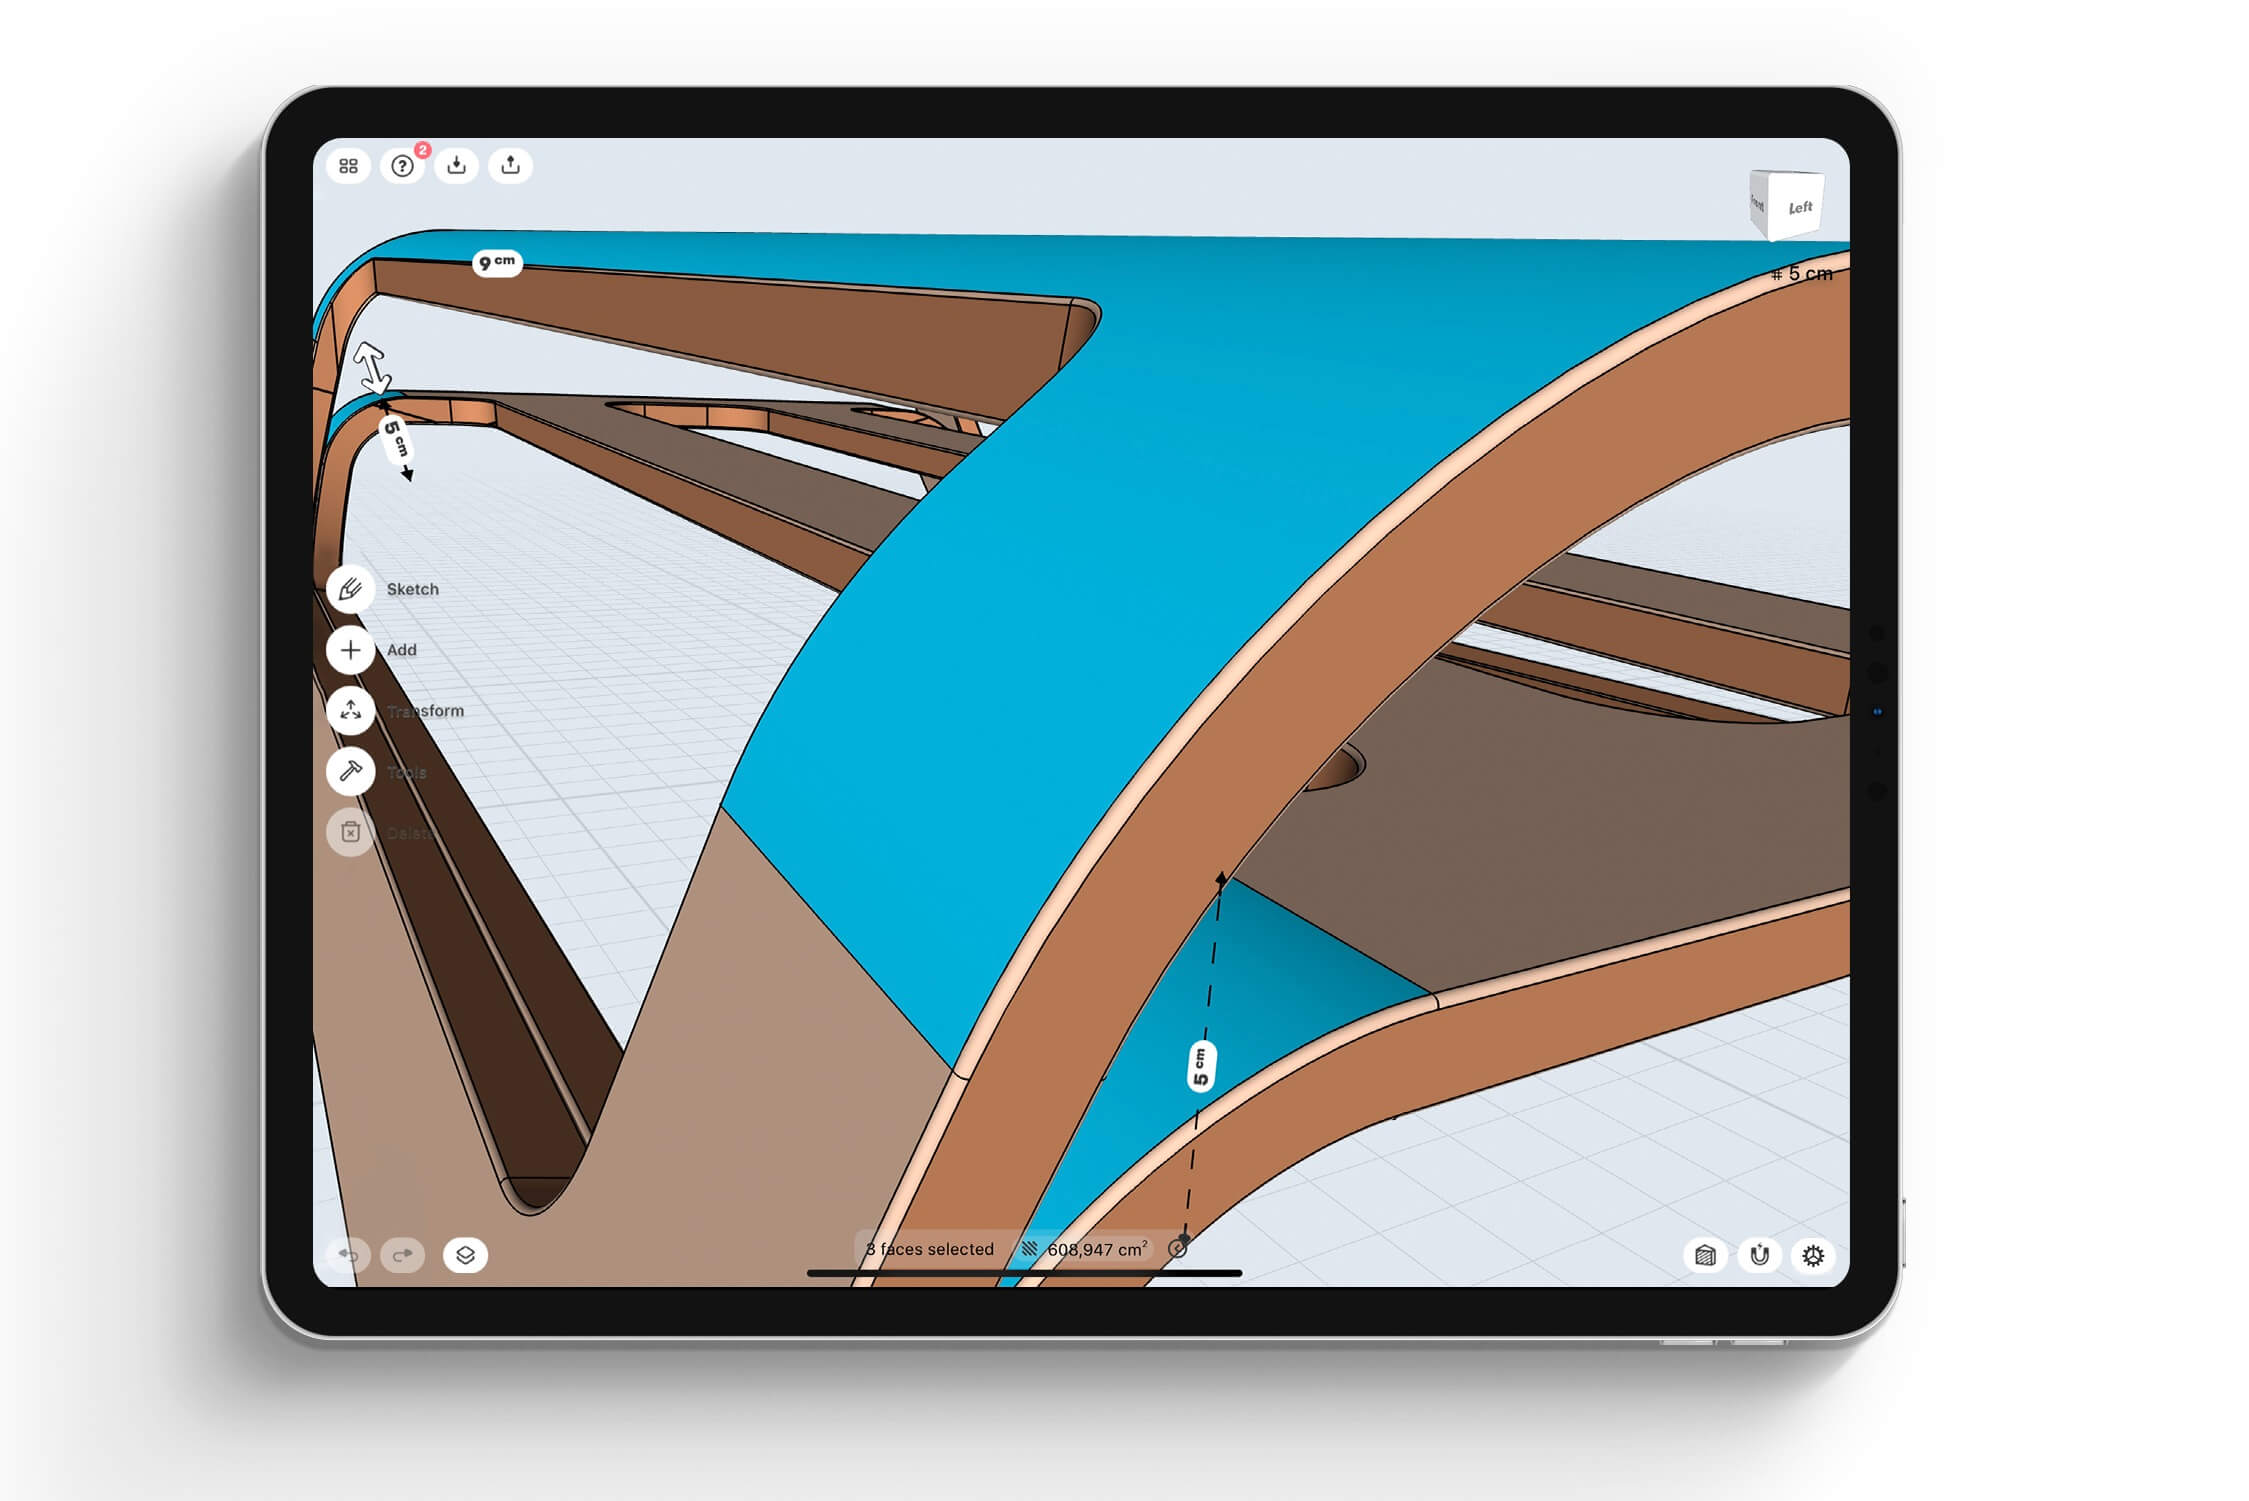
The radius of the upper and lower arches are designed to be both self-supporting structures and iconic design elements.
The “double arch” construction of the Slē was designed based on physical properties that made it durable enough to withstand recurring forces while sledding.
Method 4.
3D printing
The best iterations can be 3D printed to provide the client with an actual model for consideration.
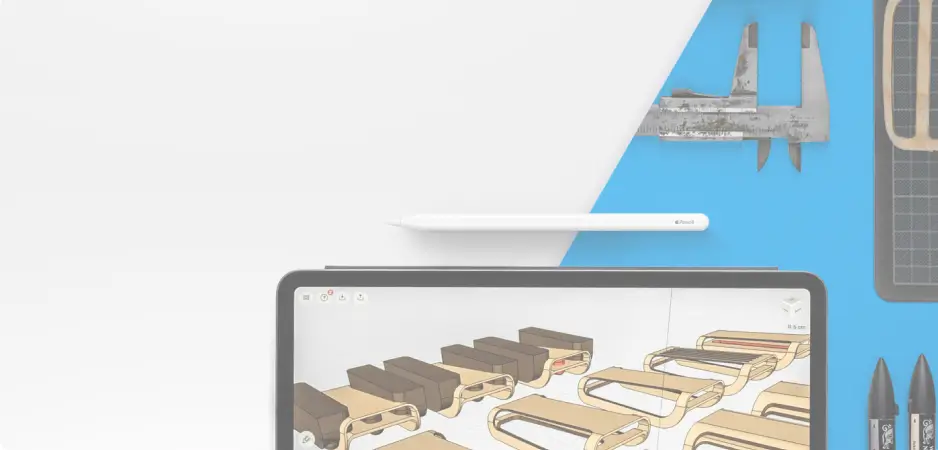
I exported an .stl file from my project in Shapr3D and printed a few scaled models with the proper dimensions, thickness and geometry. While I’m validating, revising and making adjustments to the 3D printed versions of my models, I will create a few dozen to over 100 versions.
3D prototypes can be printed quickly and are ideal for checking ratios and dimensions, even on a smaller scale. This process is also usually iterative — the low cost and speed let you print several models, make adjustments and print more.

Method 5.
Cardboard 3D prototypes
Sketching and CAD modeling is always iterative in my design process. I decided to make more refined mockups from cardboard, as the product itself is also made from bent sheets. I used the M1:10 scaled Shapr file and created an unrolled surface contour to guide cutting.
Cardboard 3D prototypes are an even faster and cheaper alternative for refining the product concept. By simply tracing the shape, cutting the contours, folding and pasting the creases, this phase lets you ‘think’ in 3D.
It’s easy to create dozens of mockups quickly with this technique. Although the ratios and dimensions of the end result will not be precise, the goal is to experiment with different details and shapes. 3D printing prototypes is a better alternative for validating measurements.

Method 6.
Molded veneer model
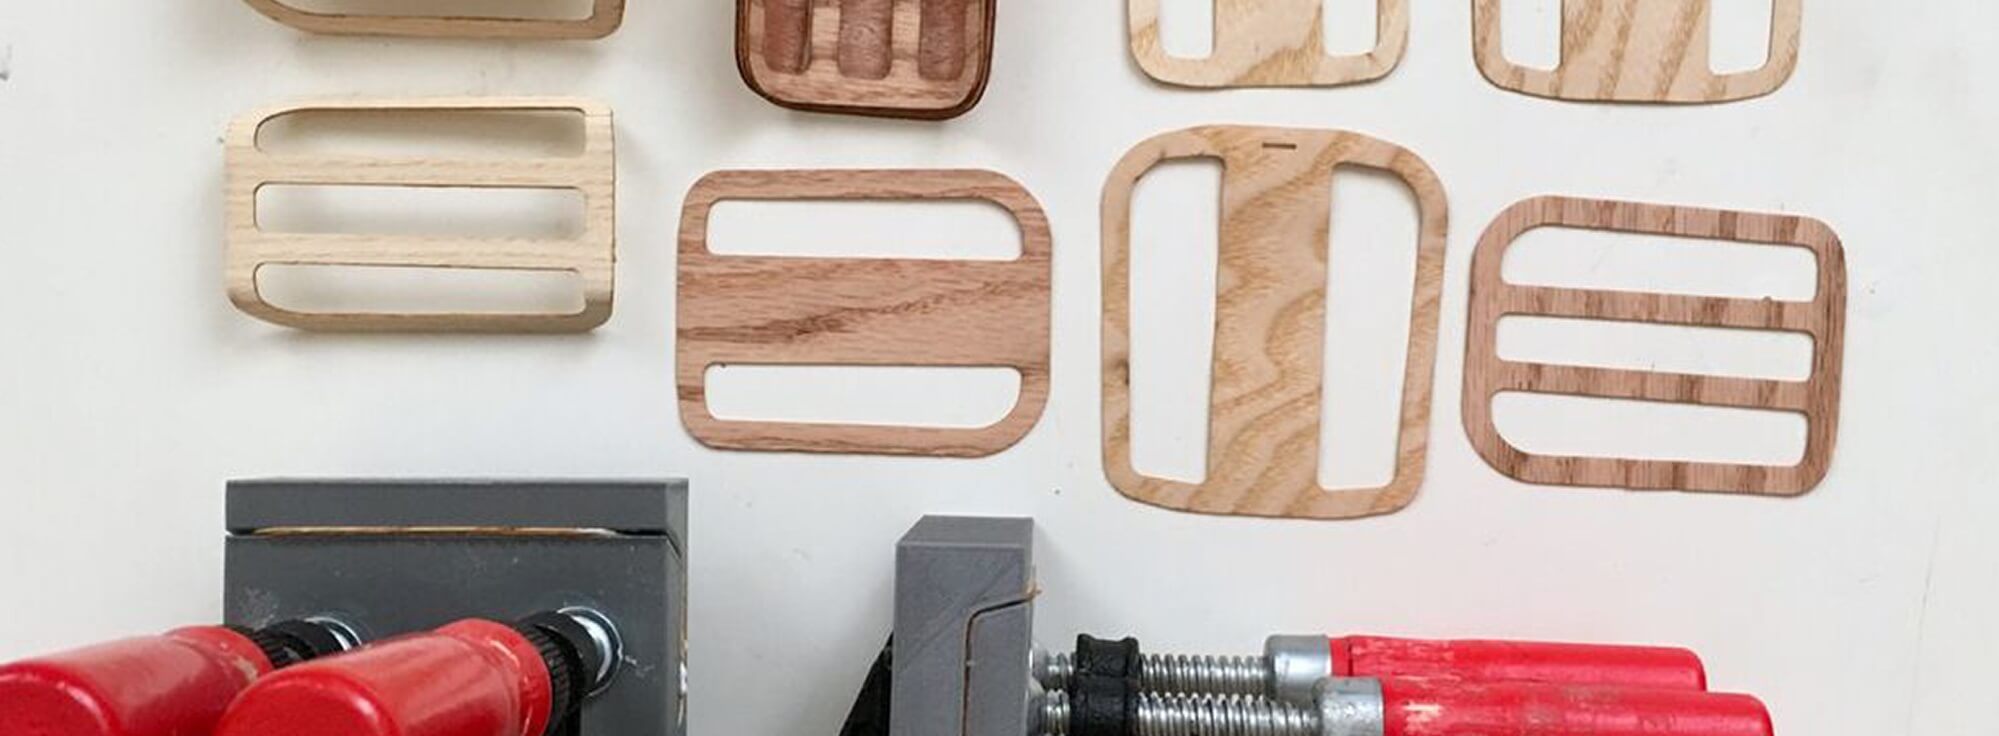
Another method, equally useful and a bit more elegant is to create a 3D printed mould and recreate the mockups using veneers. This method makes it easier to define manufacturing properties and make cor rections in the CAD model.
I laser-cut the outline of the sled onto veneer sheets and bent them into shape using a 3D printed jig. Due to the scale of the mockup I only used 2-3 layers of veneer for each element. The process was repeated with several types of veneer, which also helped me validate any lingering CMF questions.
This step allows you to look at weaknesses in the design, and also doubles as an elegant mockup for presentations.
Design Tip - Presenting your first ideas
These mockups become exceptionally useful for presenting products to potential consumers. I also use them to consult with manufacturers. It is always better to discuss with a manufacturer with the mockup in hand, to ease visualization and also to highlight the points of discussion.
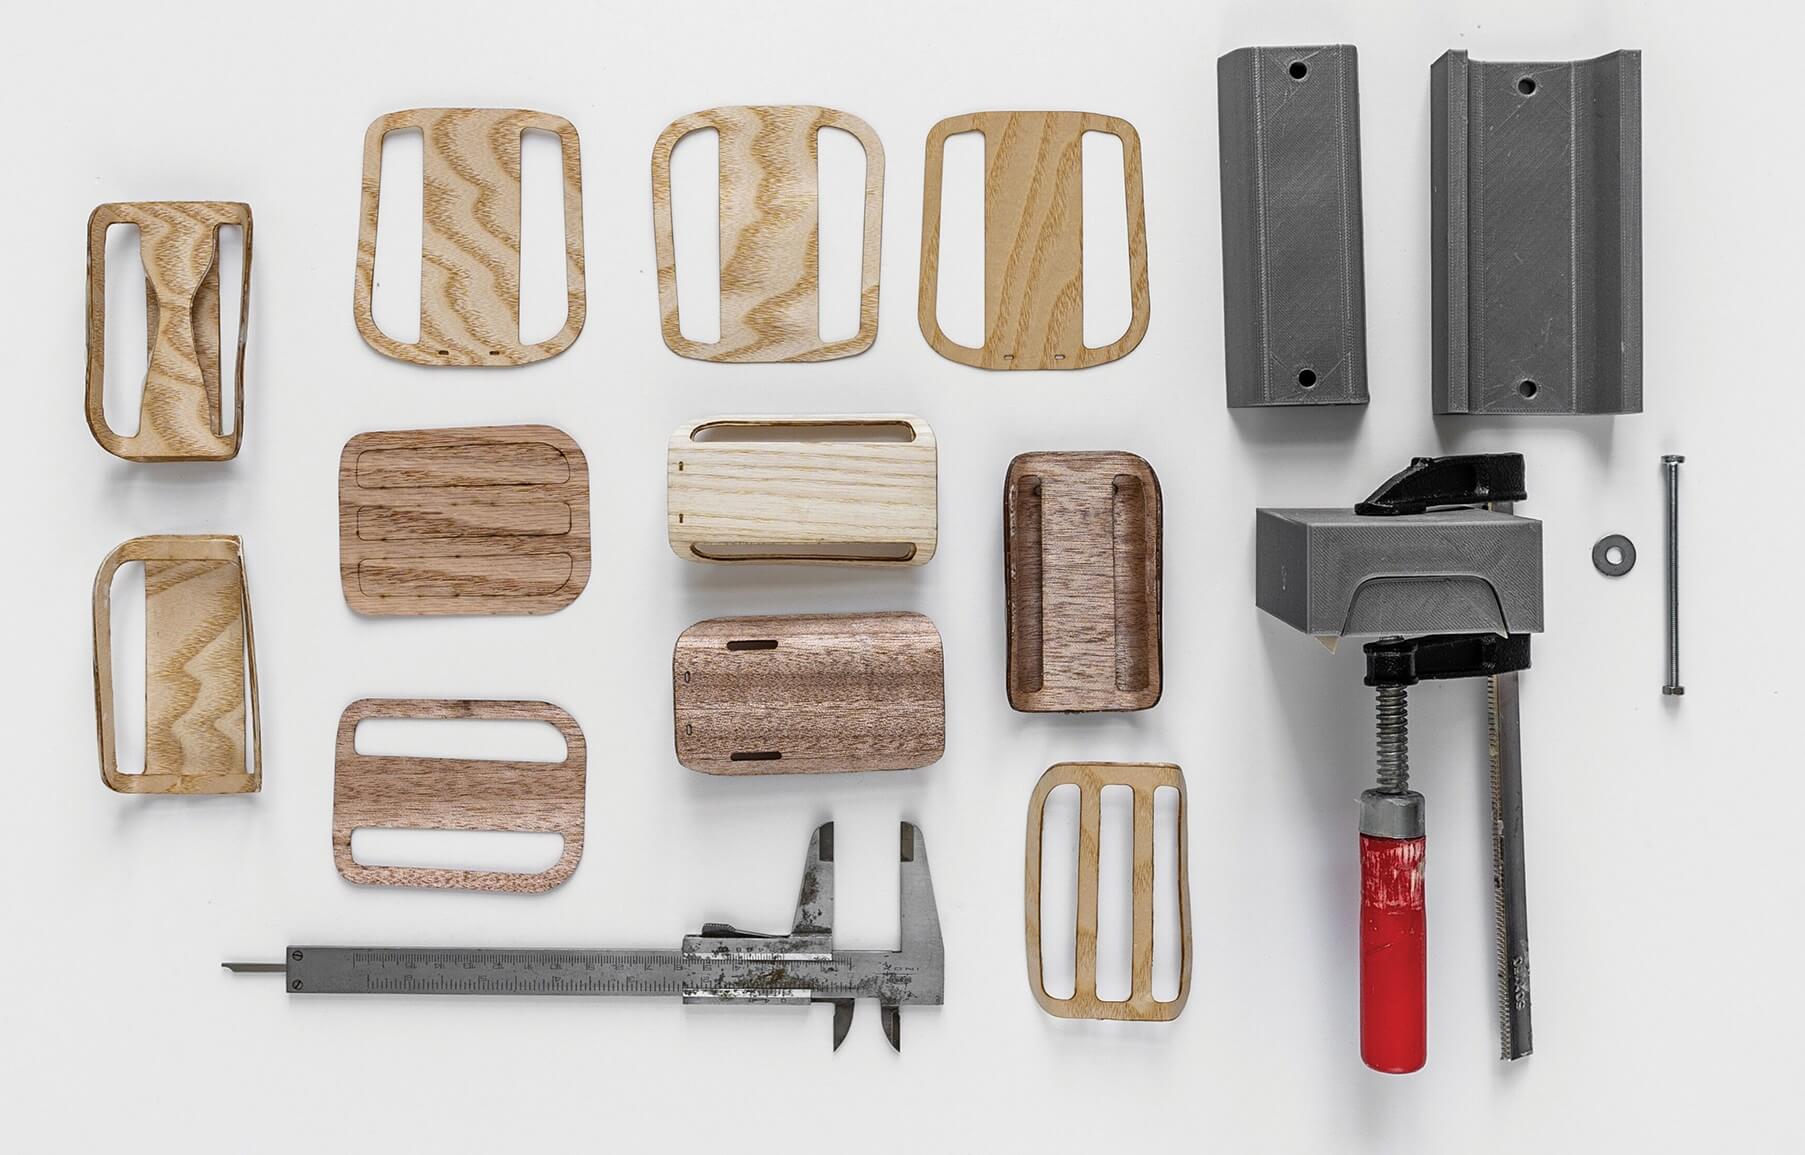
Photo-realistic renders
I then refined the CAD model in Shapr3D based on the insights and feedback I collected while presenting the mockup iterations.
I exported the .step file and opened it in Rhino and VRay for rendering. I like V-Ray because it creates fine shadow, reflections and textures for results that are visually photo-realistic. The visuals are used for presenting to consumers, distributors and investors.
Preparing for manufacturing 1.
Scale model
Once I was satisfied with the details of the scaled prototypes I decided to verify the design on a M1:1 scale. I created outlines from the CAD model and used a laser cutter to cut each layer from cardboard.
I’m happy with the result as it is a very durable construction, even in its cardboard form. The design is ready for consulting with manufacturers and adding the final adjustments for mass production optimization.
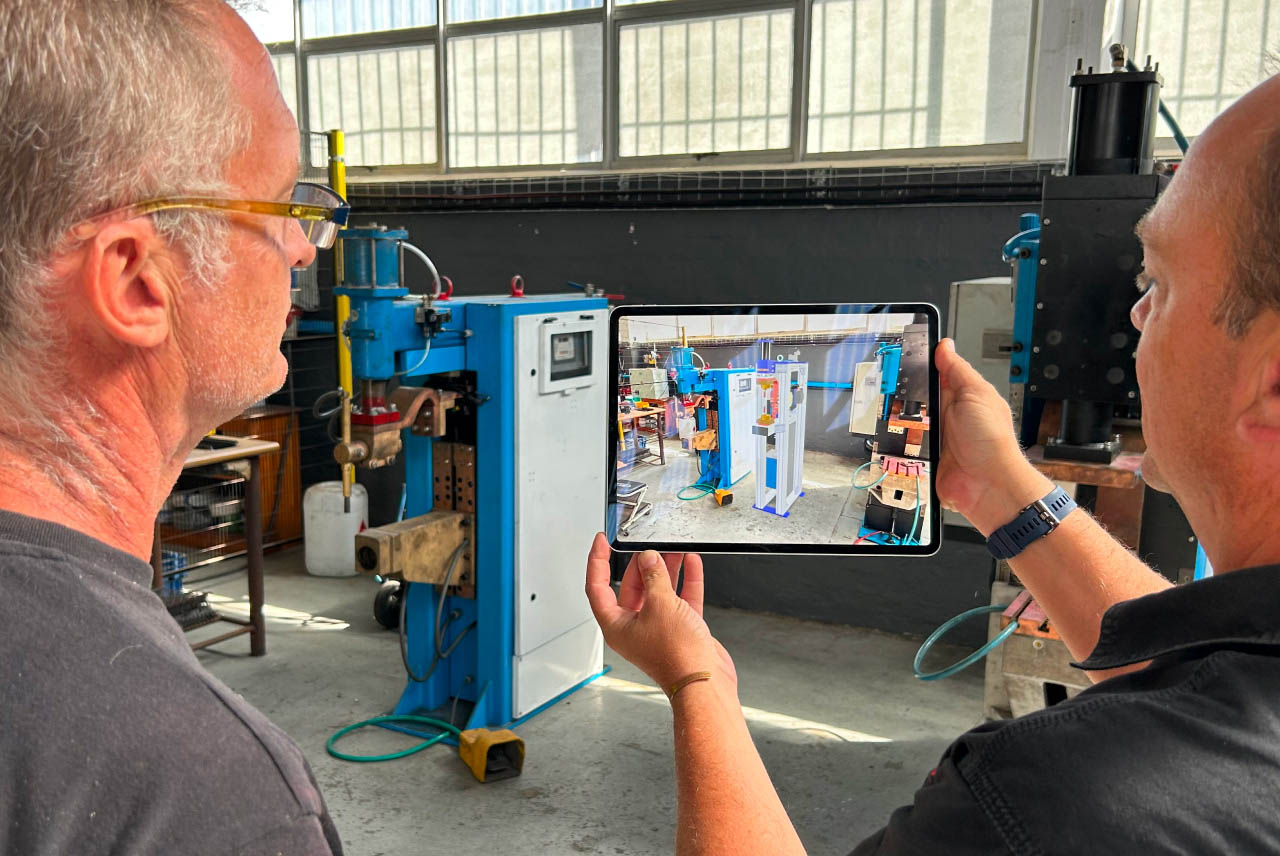
Design Tip - Choosing and talking to your manufacturer
I usually choose a manufacturer based on my impression of them, and whether I feel that they work professionally. In the case of the Sle, because it’s a small series product, I’m also looking for a proactive, creative attitude.
First, I speak with the manufacturers through design plans, 3D models and mockups and based on their feedback I’ll prepare the file. Then comes an iterative process, where the manufacturer redesigns the product based on manufacturing principles and sends it back to me for revisions. This development process can go through 4-5 rounds of iteration until the final manufacture ready file is produced.

Preparing for manufacturing 2.
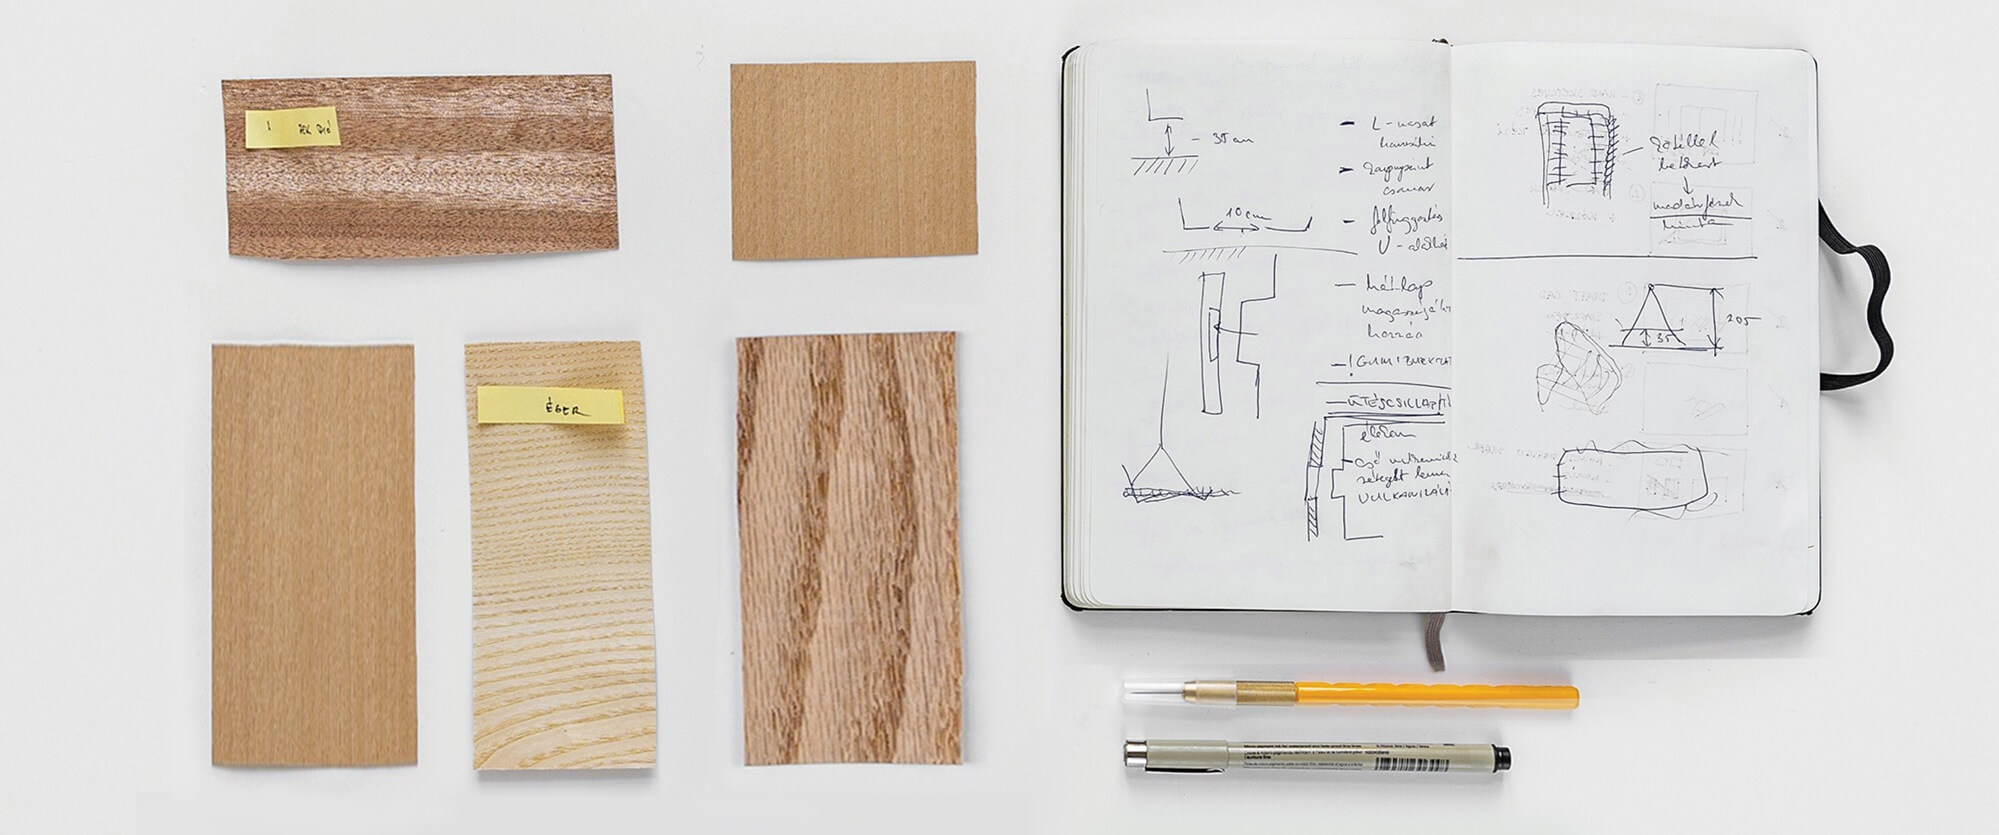
Color, material, finish (CMF)
CMF is an important part of the material selection and the upcoming manufacturing process. During the CMF (Color, Material and Finish) design phase I tested 5 common plywood veneers. Each selection was ranked based on their physical properties, aesthetics, local sourcing and costs. I finally settled on Beech plywood.
Beech plywood is a hardwood plywood that’s incredibly strong yet still flexible, with a high resistance to creep and impact. Beech is commonly used for sports gear and furniture, and its color and texture are warm and friendly. Once I decided to use Beech, I tested its resistance against harsh environmental factors like ice and water immersion, and whether it was durable enough for an activity like sledding. I also checked the viability of Beech with manufacturers.